Saturday, December 31, 2011

How to Install Windows 8 Using VMware Fusion

Note: Windows 8 probably won't be officially released until later in 2012. You can currently download and install the developer version of the operating system for free.
Here's how to install Windows 8 on your Mac using VMware Fusion:
  1. Download the Windows 8 .iso file from the Microsoft Windows Dev Center. It's currently a free download. The 64-bit version is recommended. (Unless you'll be coding, you don't need to download the file with the developer tools.)
  2. If you haven't already, download the VMware Fusion application.
  3. Open the VMware Fusion application.
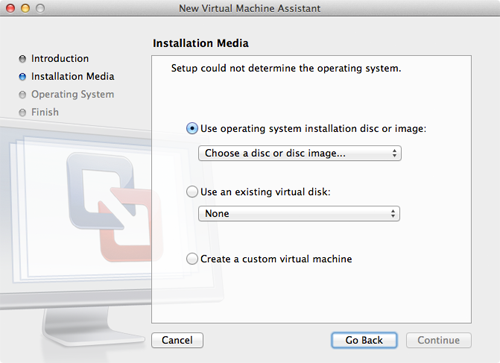
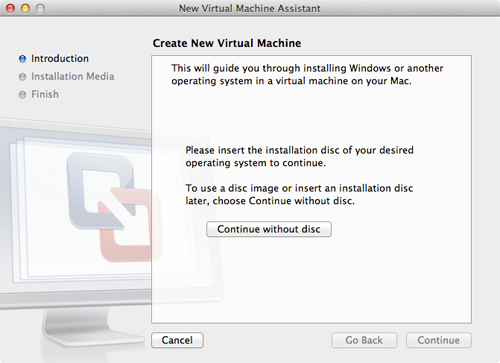
  4. From the File menu, select New. The New Virtual Machine Assistant window shown below appears.
  5. Click Continue without disc. The window shown below appears.
  6. Click the Use operating system installation disc or image button, if it is not already selected.
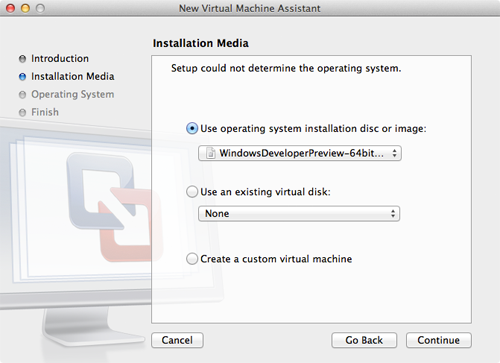
  7. To install Windows 8 from the .iso file you downloaded, select Choose a disc or disc image... from the menu with the same name. The selection window appears. Select the .iso file you downloaded from the Microsoft website, and then click Open. The .iso file appears in the menu as shown below.
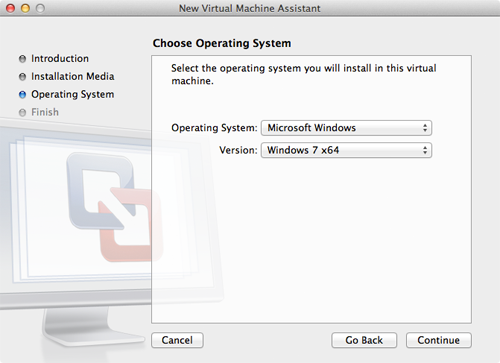
  8. Click Continue. The window shown below appears.
  9. From the Operating System menu, select Microsoft Windows.
  10. From the Version menu, select Windows 7 x64 if you downloaded the 64-bit version of Windows 8, or Windows 7 if you downloaded the 32-bit version.
  11. Note: Don't worry about "Windows 7" part. All this means is that VMware Fusion doesn't have a preset virtual machine for Windows 8 yet.)
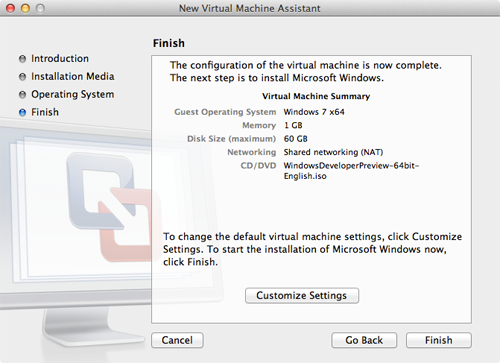
  12. Click Continue. The window shown below appears.
  13. VMware Fusion displays a summary of the virtual machine you're able to create. By default, it will allocate 1GB of RAM and a maximum of 60GB of your computer's hard disk space to Windows 8. (The virtual machine only uses the amount of space necessary - the base installation only consumes about 4GB of hard disk space.) You could customize these settings now, but it's not necessary - you can always change them later by selecting Virtual Machine → Settings after the virtual machine has booted. ClickFinish.
  14. You are prompted to save the virtual machine to your hard disk. Leave the file name and location set to the default settings. Click Save. VMware creates and boots the virtual machine. The window below appears after Windows 8 boots for the first time.
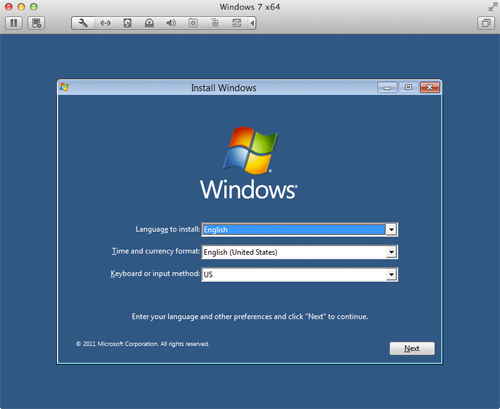
  15. Select a language, time format, and keyboard layout.
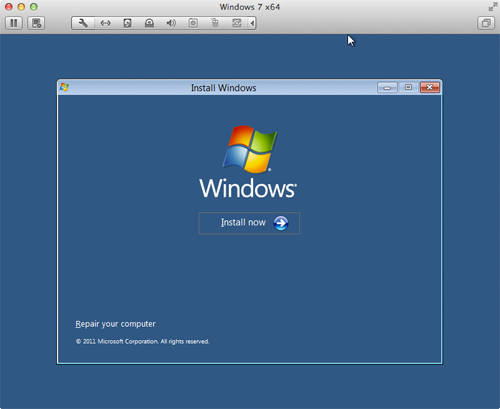
  16. Click Next. The window shown below appears.
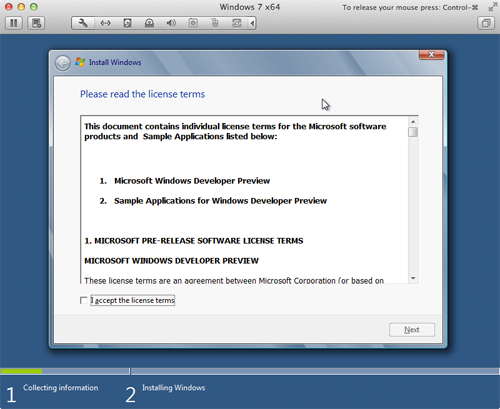
  17. Click Install Now. The window shown below appears.
  18. Select the I accept the licence terms checkbox.
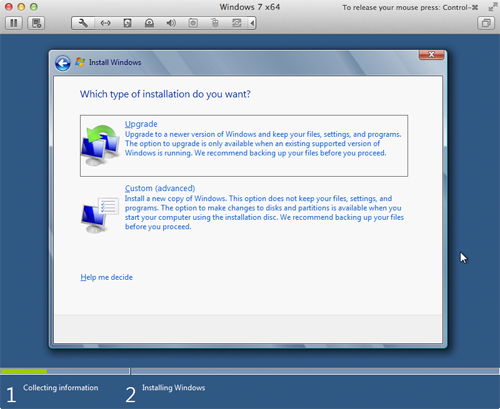
  19. Click Next. The window shown below appears.
  20. Click Custom (advanced). This tells Windows 8 that you are installing it on a fresh hard disk. The "hard disk" is virtual, of course, but Windows 8 doesn't know that. The window shown below appears.
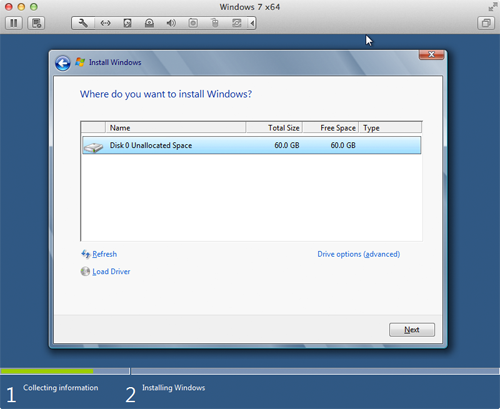
  21. The virtual hard disk should be the only option displayed. Select it, and then click Next. The window shown below appears.
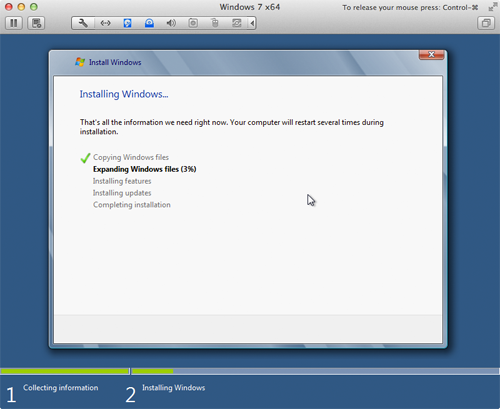
  22. You've finished providing information and Windows 8 is finally installing. Go get a cup of coffee - this can take up to half an hour. When the installation process is finished, the window shown below will appear.
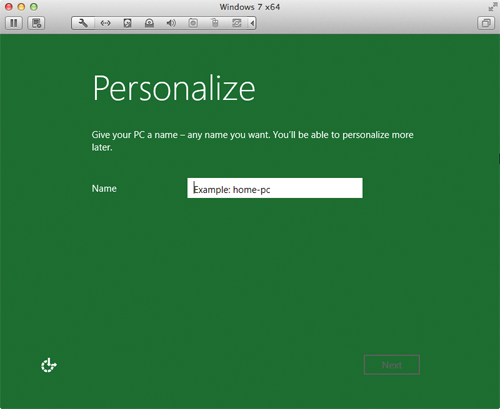
  23. Aha! You only though you were finished providing information. Now you need to type a name for the virtual Windows 8 computer and click Next. The window shown below appears.
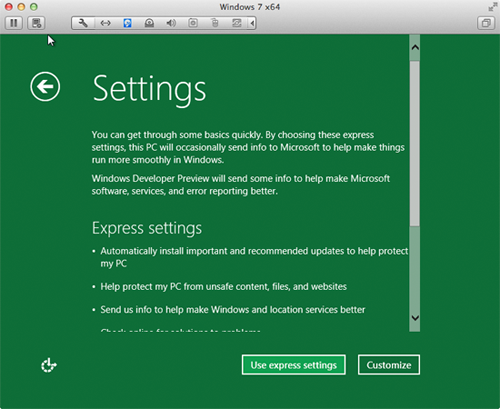
  24. Do you want to customize all of these settings? Probably not right now, at least not for this Windows 8 preview running in a virtual machine. Click Use express settings. The window shown below appears.
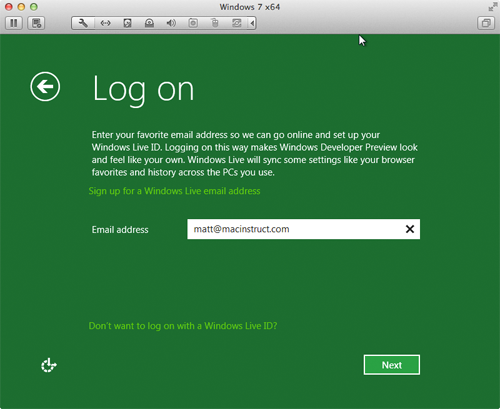
  25. If you have a Windows Live ID, enter the email address you use for that account. Otherwise, just type your email address and click Next. The window shown below appears.
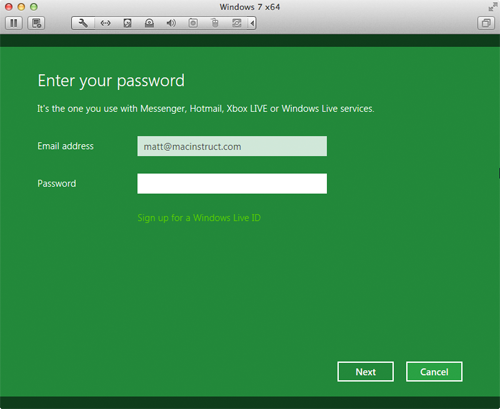
  26. Enter the password for your Windows Live ID, or click Sign up for a Windows Live IDand follow the instructions. When finished, click Next.
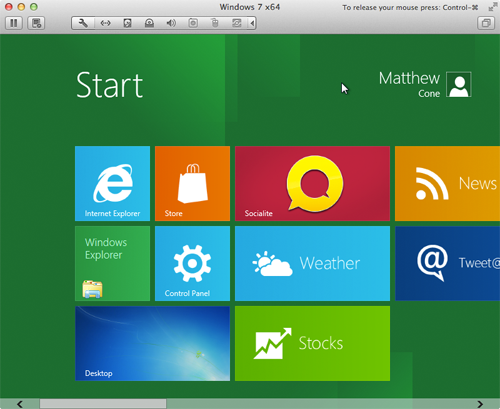
  27. Windows "finalizes your settings" and "prepares your PC." (Sorry, the Microsoft-speak is too funny!) Once it's done, your virtual machine will be booted into Windows 8, as shown below.
  28. As you can tell from the screenshot, this version of Windows is radically different than previous versions. Or is it? Click the Windows Explorer button and you're back in the familiar looking Windows interface. Go ahead and click that button now. (You can always click the Windows "Start" button to get back to the new Windows 8 interface.)
  29. The last thing we need to do is install VMware Tools. This package makes Windows 8 look and feel better inside the virtual machine on your Mac. To get started, select Install VMware Tools from the Virtual Machine menu.
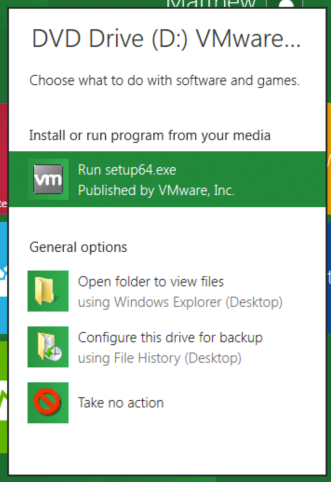
  30. VMware asks you if you want to connect the VMware Tools installer to the virtual machine. Click Install. The dialogue shown below appears in the virtual machine.
  31. Click that dialogue window. The window shown below appears.
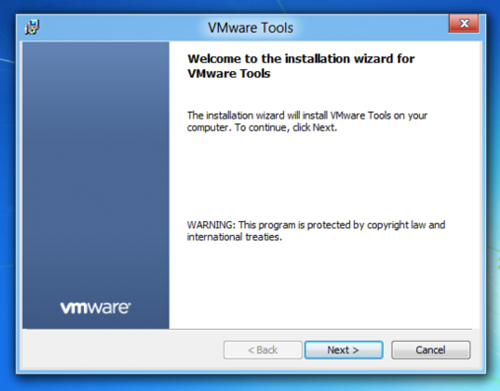
  32. Click Run setup64.exe. The VMware Tools installer appears, as shown below.
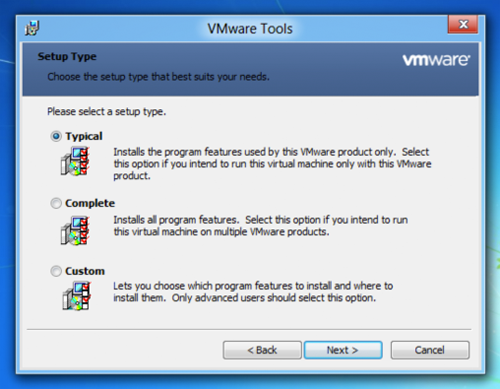
  33. Click Next. The window shown below appears.
  34. Select Typical, and then click Next.
  35. Click Install. VMware Tools installs on the Windows 8 virtual machine. Once the installation completes, you'll need to restart the virtual machine. When it turns back on, the display should look crystal clear - that's how you know that you successfully installed VMware Tools in the virtual machine running Windows 8!
Now you have Windows 8 running in a virtual machine on your Mac. A lot has changed since Windows 7, so have fun messing around!

submitted by guest bloger
vicky sanchezhamburg, Germany
Retweet this story

How to Monitor Your Mac's Firewall Logs

If you're reading this article, you probably know that Mac OS X has a built-in firewall that should be turned on at all times. But how do you know that the firewall working, and how do you find out what's happening behind the scenes? To check, you need to access your Mac's firewall log- a file that contains a record of every event the firewall has processed.
Here's how to monitor your Mac's firewall logs:
  1. Verify that your Mac's firewall is turned on.
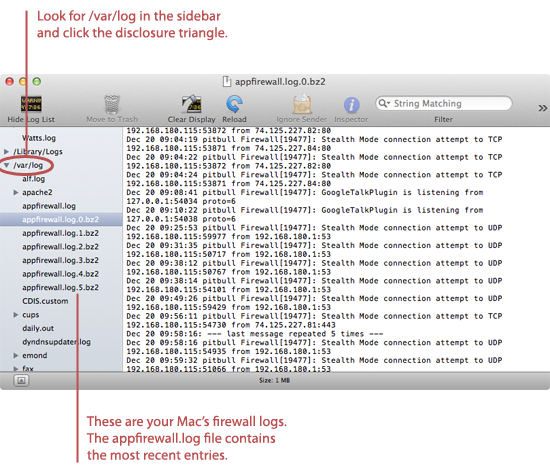
  2. Open the Console application. (It's in Applications → Utilities.) The window shown below appears.
  3. In the sidebar, find the /var/log directory. Click the disclosure triangle next to that directory.
  4. The most recent log entries from the Firewall are stored in the appfirewall.log file. Find that file in the sidebar and select it.
  5. The log entries from the firewall log appear in the right-hand pane of the window. If you scroll all of the way to bottom, you can watch the firewall entries update in real time!
As mentioned earlier, the appfirewall.log file contains the most recent log entries from the firewall. Once that file fills up with log entries and reaches 1 MB, the log is rotated, and all of the entries in appfirewall.log are moved to appfirewall.log.0.bz2. (And all of the other archived log files are also renamed. For example, the appfirewall.log.0.bz2 file becomesappfirewall.log.1.bz2.) So if you're looking for firewall events that occurred several weeks ago, you'll need to start your search in one of the files with older log entries.

How to Read Firewall Log Entries

Unless you have some experience looking at log files, the firewall events probably look like a bunch of mumbo jumbo. Don't worry. Once you understand the basics, you'll be able to discern what's happening with many of the events.
Take a look at the entry below, for example:
Dec 27 21:50:58 Pitbull Firewall[113]: Stealth Mode connection attempt to UDP 192.168.0.2:49747 from 192.168.0.1:53
Here's what each part of the entry means:
  • Dec 27 21:50:58 is the date and time when the event occurred.
  • Pitbull is the name of the Mac in this example. Your computer's name will be there in its place.
  • Firewall[113] is the type of log event. (All of the events in this particular log file are firewall events.)
  • Stealth Mode connection attempt to UDP means that another computer on the LAN or WAN attempted to connect to your computer when it wasn't expecting it. UDP is the type of protocol.
  • 192.168.0.2 is your Mac's IP address. Since it starts with 192.168, we know that this is an internal address on the LAN. And 49747 is the port on your Mac the other computer attempted to connect to.
  • 192.168.0.1 is the IP address of the computer or device attempting to initiate a connection with your Mac. And 53 is the port that the connection attempt originated from.
Practice makes perfect. After a while, reading your Mac's firewall log will become second nature. You'll be able tell which events are important and which events are benign. More on that in the next section.

Should I Be Concerned?

Most events logged by the firewall are completely harmless. There's no reason to be concerned about 99% of the events in the log, unless you're experiencing connectivity problems on your Mac. In the example above, the firewall blocked valid traffic from a DNS server, which could conceivably cause problems.
When in doubt, search Google for the port the connection attempt originated from and the port on your Mac the other computer tried to connect to. Many times you'll find that the ports are fairly typical and correspond to an application running on your computer. For example, a Torrent server connection might be blocked when you are running an application likeTransmission.
If you see a lot of connection attempts to a lot of different ports, that could be an indication that your computer has been port scanned by another computer - a process that looks for open ports and vulnerabilities. But even if your Mac was port scanned, your Mac's built-in firewall will block it. So again, there's no reason to be concerned.
So the bottom line is that most events in the firewall log are "normal" and indicate that the firewall is working. Don't panic if you see a lot of entries in your logs!

Final Thoughts

Obviously, monitoring the firewall log is not something you need to do regularly, or even occasionally. This is a trick that comes in handy only when you need to verify that the firewall is working, or when you suspect a problem or hacking attempt. Of course, system administratorsroutinely check firewall logs as part of their job duties, but that's in an enterprise environment.


submitted by guest bloger
anita schnide
atlanta, US
Retweet this story

Friday, December 30, 2011

How to Configure Ubuntu OpenSSH Server

This section of the Ubuntu Server Guide introduces a powerful collection of tools for the remote control of networked computers and transfer of data between networked computers, called OpenSSH. You will also learn about some of the configuration settings possible with the OpenSSH server application and how to change them on your Ubuntu system.
OpenSSH is a freely available version of the Secure Shell (SSH) protocol family of tools for remotely controlling a computer or transferring files between computers. Traditional tools used to accomplish these functions, such as telnet or rcp, are insecure and transmit the user's password in cleartext when used. OpenSSH provides a server daemon and client tools to facilitate secure, encrypted remote control and file transfer operations, effectively replacing the legacy tools.
The OpenSSH server component, sshd, listens continuously for client connections from any of the client tools. When a connection request occurs, sshd sets up the correct connection depending on the type of client tool connecting. For example, if the remote computer is connecting with the ssh client application, the OpenSSH server sets up a remote control session after authentication. If a remote user connects to an OpenSSH server with scp, the OpenSSH server daemon initiates a secure copy of files between the server and client after authentication. OpenSSH can use many authentication methods, including plain password, public key, and Kerberos tickets.

Installation

Installation of the OpenSSH client and server applications is simple. To install the OpenSSH client applications on your Ubuntu system, use this command at a terminal prompt:
sudo apt-get install openssh-client
To install the OpenSSH server application, and related support files, use this command at a terminal prompt:
sudo apt-get install openssh-server
The openssh-server package can also be selected to install during the Server Edition installation process.

Configuration

You may configure the default behavior of the OpenSSH server application, sshd, by editing the file /etc/ssh/sshd_config. For information about the configuration directives used in this file, you may view the appropriate manual page with the following command, issued at a terminal prompt:
man sshd_config
There are many directives in the sshd configuration file controlling such things as communication settings and authentication modes. The following are examples of configuration directives that can be changed by editing the /etc/ssh/sshd_config file.
[Tip]
Prior to editing the configuration file, you should make a copy of the original file and protect it from writing so you will have the original settings as a reference and to reuse as necessary.
Copy the /etc/ssh/sshd_config file and protect it from writing with the following commands, issued at a terminal prompt:
sudo cp /etc/ssh/sshd_config /etc/ssh/sshd_config.original
sudo chmod a-w /etc/ssh/sshd_config.original
The following are examples of configuration directives you may change:
  • To set your OpenSSH to listen on TCP port 2222 instead of the default TCP port 22, change the Port directive as such:
    Port 2222
  • To have sshd allow public key-based login credentials, simply add or modify the line:
    PubkeyAuthentication yes
    In the /etc/ssh/sshd_config file, or if already present, ensure the line is not commented out.
  • To make your OpenSSH server display the contents of the /etc/issue.net file as a pre-login banner, simply add or modify the line:
    Banner /etc/issue.net
    In the /etc/ssh/sshd_config file.
After making changes to the /etc/ssh/sshd_config file, save the file, and restart the sshd server application to effect the changes using the following command at a terminal prompt:
sudo /etc/init.d/ssh restart
[Warning]
Many other configuration directives for sshd are available for changing the server application's behavior to fit your needs. Be advised, however, if your only method of access to a server is ssh, and you make a mistake in configuring sshd via the /etc/ssh/sshd_config file, you may find you are locked out of the server upon restarting it, or that the sshd server refuses to start due to an incorrect configuration directive, so be extra careful when editing this file on a remote server.

SSH Keys

SSH keys allow authentication between two hosts without the need of a password. SSH key authentication uses two keys aprivate key and a public key.
To generate the keys, from a terminal prompt enter:
ssh-keygen -t dsa
This will generate the keys using a DSA authentication identity of the user. During the process you will be prompted for a password. Simply hit Enter when prompted to create the key.
By default the public key is saved in the file ~/.ssh/id_dsa.pub, while ~/.ssh/id_dsa is the private key. Now copy theid_dsa.pub file to the remote host and append it to ~/.ssh/authorized_keys by entering:
ssh-copy-id username@remotehost
Finally, double check the permissions on the authorized_keys file, only the authenticated user should have read and write permissions. If the permissions are not correct change them by:
chmod 600 .ssh/authorized_keys
You should now be able to SSH to the host without being prompted for a password.
Retweet this story

Thursday, December 29, 2011

How To Generate Strong Passwords in Ubuntu

Generating Strong Passwords in Ubuntu


Now that we've establish what constitutes a strong password. How do we have our computers help generate strong passwords automatically? This section will cover the Automatic Password Generator application (APG) which is available in Ubuntu via System Administration (universe). APG does precisely what its name implies: it automatically generates passwords. Not only does APG generate passwords, it will generate strong passwords for you as well. If you wish to study APG further, you may find all information at the APG website. (see the Resources section of this guide)
IconsPage/IconTip.png It should be noted here that Ubuntu's password functions for user accounts do provide some means of enforcing strong passwords for user accounts, but there are cases, and applications where the strength of the password cannot be enforced in this manner, and so this guide exists to help the user generate acceptable strong passwords.

Installing APG


To install APG, ensure you have enabled the Universe Packages,  and have a live connection to the Internet, then issue the following command at a command prompt:
 sudo apt-get install apg
You will be prompted for a password. The password being requested is your user password, or the same password you use when issuing commands with the sudo command. After authentication, the APG package will be downloaded, and installed. You are now ready to begin using, and further configuring APG to your liking.

Using APG


The default behavior of APG installed on Ubuntu via apt-get when executed, is to prompt for random data from standard input (typically the keyboard) and upon pressing enter, display six (6) strong "pronounceable" passwords. They are referred to as "pronounceable" because the passwords may actually be pronounced like regular words. In fact, APG includes the pronunciation in parentheses () to the right of each password. Additionally, they are strong passwords because they include a mix of lowercase, uppercase, and numeric characters. An example of executing apg and the default output of APG is presented here:
apg
APG prompts for the input of random keyboard keys, and then, after pressing ENTER, produces output similar to this:
queafWodEis5 (queaf-Wod-Eis-FIVE)
WoudElIc6 (Woud-El-Ic-SIX)
GorIacNewt8 (Gor-Iac-Newt-EIGHT)
ShratUplEov7 (Shrat-Upl-E-ov-SEVEN)
hexLyafByff1 (hex-Lyaf-Byff-ONE)
Irkyorn9 (Irk-yorn-NINE)

If you would like to enforce different behavior from APG, there are many options you may pass to the apg command for the purpose of changing the default output, and behavior of APG. For example, to generate random character passwords instead of the pronounceable passwords, you may invoke APG with the -a 1 option, where -a is the algorithm APG uses, and 1 selects random mode. The following command would produce six (6) random character passwords with no prompting to input random data:
 apg -a 1
Upon executing the above command, APG outputs a list of six (6) random character passwords similar to these:
S:w[AOe<
!_IlD#_G/~
)lL`avASe6
SgzlI:lU?h
~Wc(0b"{
'4fU25w%}

If you wish to always enforce prompting for random data from standard input (keyboard), to ensure the most secure passwords possible, you should explicitly tell APG to do so with the -s option.
Another example would be the generation of four (4) WiFi Protected Access (WPA) Pre Shared Keys (WPA PSKs) having the maximum supported WPA PSK length of 63 random characters for use with modern WiFi equipment, such as a Wireless Access Point (WAP). To generate such a sequence, and use random data prompting, issue the following command at a command prompt:
apg -s -a 1 -m 63 -n 4
After supplying the random keyboard data, and pressing ENTER a list of strong WPA PSKs will be presented, similar to these:
+DIaz*<DmO6VAFR/cQ>B^'[mtB;J1ABi*n"B<=|_My"5bZv#*iRJH!0oCcf!,@Z
os#?3;sC2}/A>lG^e*9%9}pd^&A\'eLkdC,lk#jB,bcg70I|q@U:^VZP"}>3z?G
rj??<_Ej%-:2LW;4q_?53$ab$U_~1I(({`^LN1Hd&&gKj+Dw;EqR<\qH_VQ{`s!
"x3up};b~/jU6Vo,t">Dr~f_U`NSNr30JmOD@c'Y:p2wvc"0s?$MtT<S5Qr\AZi

Many other options are available. You should consult the APG manual page, and the APG website for further information. (see the Resources section of this guide)

Generating Strong Passwords Manually


Some people find that they remember their password better when they come up with one on their own. This section provides an example of how to manually generate a strong password. Keep in mind that because the examples here are viewable by anyone, these exact results should be avoided.
The first step is to choose a phrase which you can easily remember, but is at least 8 words long. This can be a favourite quote, a line from your favourite song, something you heard randomly while walking around, or even an obscure reference to a movie you like. For this example, we'll choose "To be or not to be, that is the question".
Now, convert your phrase to a single word. Exactly how you do so is not important, as long as you remember how you did it! We'll take the first letter of each word, which gives us "tbontbtitq". Now, we have one character class, the lower case letter. To get upper case letters, simply randomly capitalize letters. We'll capitalize each third letter, and end up with "tbOntBtiTq".
Now, we'll get some numbers. That 'O' looks a lot like the number zero, so let's replace 'O' with '0': "tb0ntBtiTq". There's a lot of 'T' characters in there, so let's also replace one of them with the number '7': "tb0n7BtiTq". Finally, we'll go after a symbol or two. With a little imagination, you can see how the symbol '^' and the letter 'l' beside each other somewhat resemble the general shape of the letter 'N', so replace the 'n' with those: "tb0^l7BtiTq". Just to make it a little better, we'll add one last symbol. You'll notice that the exclaimation point (!) resembles a lower case 'i' upside down. Replace the 'i' with '!' to get the final password: "tb0^l7Bt!Tq".
Just keep in mind that certain characters (like: ^,`,',~,ß,...) might be hard to locate or enter on a foreign keyboard (e.g. when travelling or using a different keyboard layout - think US 104-key layout vs. Canadian French layout).

Write Your Passwords Down


While it's clearly a bad idea to store passwords in a publicly-visible place, it's a very good idea to keep your passwords written somewhere private. It can take weeks or months to remember a strong password, and you can suddenly forget one letter of even the oldest password.
One way to have both complex passwords and memorable passwords is to generate a core password that is used as a part of all you passwords and then write down the additional parts for each site.
example:
remembered passwords:
 * core password: UbuntuR0cks

written down passwords:
 * bank A: #29G%7
 * bank B: $FF09@
 * forum 1: &*LJK2
 * forum 2: FGB&*13

Then the two elements would be combined:
 * bank A: !UbuntuR0cks#29G%7
 * bank B: !UbuntuR0cks$FF09@
 * forum 1: !UbuntuR0cks&*LJK2
 * forum 2: UbuntuR0cksFGB&*13

Don't use online password generators


The command-line tools described above are very secure. Using an online password generator means that you're relying on
  • the algoritm implemented by the online service -- is the proprietor of the online service an experienced security researcher using a well-studied algorithm? Making secure algorithms is notoriously hard and even experienced researchers are not surprised when their algorithms get broken.
  • any key material used by the online service never being compromised -- what if the site is hacked after it generates your password; could an attacker examine the algorithm and key and use it to regenerate your password later? If you don't know, then don't trust it!
  • the integrity of the online service -- do you really trust the proprietor of the online service? What if they were arrested/coerced; would you still trust them not to sell out your password?
The above password generators rely on the cryptographic primitives supplied by the linux kernel. Those primitives are battle-hardened, heavily researched and designed not to leak your password off your machine.
Retweet this story

Wednesday, December 28, 2011

How To Connect XP To Your Wireless Network

Retweet this story

Tuesday, December 27, 2011

Mac:How to Connect to Hidden Wireless Networks

Need to connect your Mac to a wireless network? You know the drill. Click on the wireless menu bar icon, select an available network, and your Mac automatically connects. But what about connecting to wireless networks that are hidden? The hidden wireless networks won't appear in the list, so you'll need to use a different method to connect to one of those networks.
Here's how to connect your Mac to a hidden wireless network:
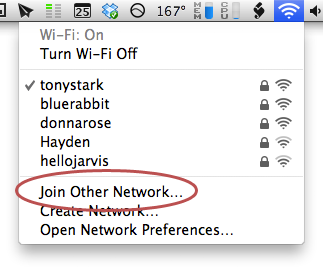
  1. From the wireless menu (on the menu bar), select Join Other Network, as shown below.
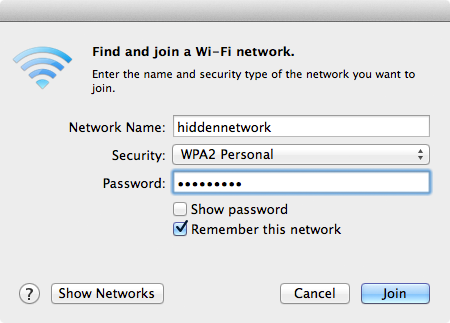
  2. The window shown below appears. Enter the name of the wireless network in theNetwork Name field. (If you don't know the name of the network, contact the owner.)
  3. From the Security menu, select the encryption level of the network you are connecting to. (Again, if you don't know the encryption level, contact the owner.)
  4. Optional: Select the Remember this network checkbox to have your Mac remember this network in the future. It's a good idea, especially if you don't want to go through this process all over again the next time you want to connect to this network.
  5. Click Join.
Now your Mac will connect to the hidden wireless network. And if you selected the remember this network feature, your Mac will automatically remember and display the hidden wireless network in the future!
Retweet this story

Monday, December 26, 2011

How To Recover your data from a faulty laptop. Easy data recovery guide.

Has your laptop suddenly died on you ? You can’t boot into Windows or even boot using a recovery CD. May be your hardware has failed so it’s impossible to boot into Windows. What do you do in this difficult situation to recover your valuable data?
There are two possible solutions to this problem and we will look into both. The first thing we need to do is take out the hard drive from the laptop. Although this might sound daunting it is actually quite a simple process. At the bottom of your laptop you will normally get plastic housing which covers your hard drive and memory. Some laptops have little logos which clearly shows the hard drive and the memory cover. Normally the bigger housing covers the hard drive.
Open the cover using a philips a screwdriver. Normally its just one screw. Once you lift the cover you will see the 2.5″ laptop hard drive.  The hard drive is connected to the motherboard via 2.5 IDE or SATA interface. Open any mounting screws that’s holding the drive and just slide the drive away from the connectors. This will release the hard drive. The next thing to do is to identify the type of hard drive you have. Check the images below so you can tell the difference between a 2.5″ IDE and SATA drive.
2.5″ IDE (pata) Interface
2.5″ SATA Interface
Once you have identified your hard drive you can recover the data using one of the two methods:
1. You can plug the laptop hard drive into an external USB enclosure as shown below. These enclosure are available for both IDE and SATA interface. They are also very cheap. This is the easiest way to perform data recovery as the laptop hard drive will act like any other mass storage device. Just pop the laptop hard into the correct enclosure and plug it into any USB port on another PC. The drive will be detected like any other Windows drive and you will see the entire file structure as you had in your laptop. Just copy the required files or folders from the laptop hard drive to the PC hard drive and your data recovery will be complete.
2.5″ USB Enclosure (IDE)
2. This method assumes you have access to a desktop PC that has an IDE or SATA interface. If your laptop hard drive has a SATA interface you can plug it directly into SATA connector of your PC. SATA data cable and power cable are exactly same on both laptop and desktop.
SATA Power & Data cable
Data recovery from a SATA laptop drive is very simple as attaching the drive to a desktop is hassle free. For more information on how to install a SATA drive please follow this guide. Once the laptop drive is installed you can boot your PC and you will see an new hard drive being detected. You can browse this drive and transfer all your data to another drive.
If your laptop drive has 2.5″ IDE interface you will need a special cable as standard IDE cable will not fit laptop hard drives. Its called 2.5″ IDE to 3.5″ converter cable.
2.5″ to 3.5″ IDE Cable
You will need to connect the 2.5″ IDE side of the cable to the Laptop drive and 3.5″ side to a spare IDE connector on your PC. The laptop side also needs to be connected to a standard power (molex) cable. For more information on how to install an IDE hard drive please follow this guide. Once the laptop drive is installed you can boot the PC and you will see an new hard drive being detected. You can browse this drive and transfer all your data to another drive. This completes the laptop data recovery process.
Retweet this story

Sunday, December 25, 2011

How to Configure Your Mac's Firewall

Every Mac ships with a built-in firewall - a service that can be configured to disallow information from entering your Mac. But what is a firewall, and why do you need to use it on your Mac?

Firewall Crash Course

Every time you request information from the Internet, such as a web page or email message, your Mac sends data packets to request the information. Servers receive the packets, and then send other packets back to your Mac. This all happens in a matter of seconds. Once your Mac has reassembled the packets, you'll see something, like an email message or web page.
A firewall can help prevent bad packets from entering your Mac. Hackers love to run automated applications that can scan thousands of computers (including your Mac) for open ports that can be exploited. To ensure that random individuals do not gain unauthorized access to your Mac, you should enable Mac OS X's built-in firewall. It will close your Mac's open ports and disallow random network scans.

Turning on and Configuring the Mac OS X Firewall

Here's how to turn on and configure your Mac's built-in firewall:
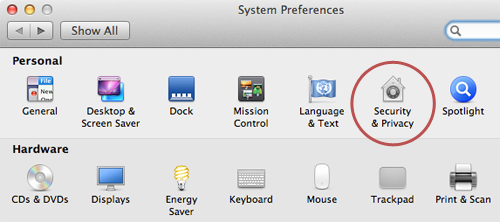
  1. From the Apple menu, select System Preferences. The window shown below appears.
  2. Select Security & Privacy.
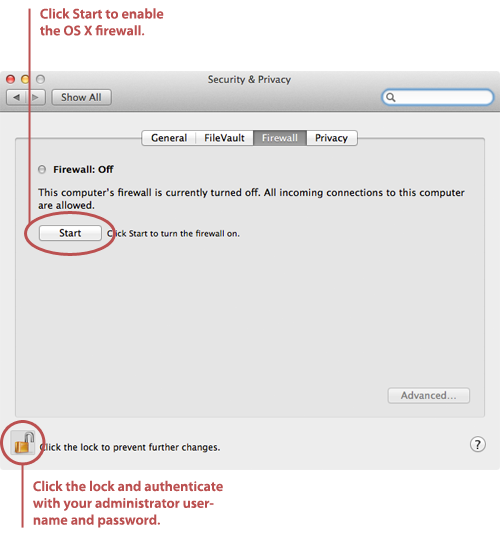
  3. Click the Firewall tab.
  4. Click the lock icon and authenticate with your administrator username and password. The window shown below appears.
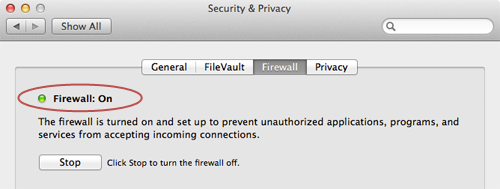
  5. Click Start. The firewall turns on - you'll know it's enabled when you see the green light and the Firewall: On message, as shown below.
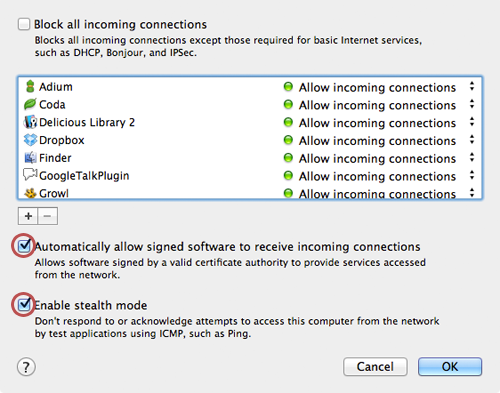
  6. Click Advanced. The window shown below appears.
  7. Select the Automatically allow signed software to receive incoming connectionscheckbox. This allows the applications on your Mac to communicate with the outside world.
  8. Select the Enable stealth mode checkbox. This prevents your Mac from responding to port scans and ping requests.
  9. Click OK to close the Advanced settings.
  10. Close System Preferences. Your Mac is now protected by the built-in firewall!

Final Thoughts

There are several third-party firewall applications available for Macs, but we don't recommend that you purchase them. Mac OS X's firewall utilizes the same industry-standard UNIX technologies that are used to protect web servers. If you're paranoid and want a beefier firewall, bone up on your UNIX skills and write some custom rules for your firewall. Leave the third-party firewall applications on the shelf, where they belong!
Retweet this story

Friday, December 23, 2011

How to install and configure a network card in Windows 7

Note: please submit any of your favorite articles or content  that is not copyright infringement, that you know will be useful to the readers out there for free for publishing .
 please submit to the admin of computgozez:    iyobor3@gmail.com

If you want to add your computer to a network or a network device like a router then you need to install or configure your network card. Every new computer and motherboard you buy nowadays has a built in network port known as RJ45 socket. If you have an older computer or a motherboard that does not have a built in RJ45 socket then your only option is to add a PCI or USB network card if you wish to connect to a network. For this guide i will assume that you do not have a network card installed. If you already have a network card then you can skip step 1 to 3.
Step 1: Install a network card. This could be PCI card or USB network card adaptor.
If you are installing a PCI card you need to open your computer case and push the PCI network card into an empty PCI slot. It is quite simple and straight forward. If you are using a USB network adaptor you simply need to plug it into an empty USB port.
PCI Network card :USB Network Adaptor:
Step 2: Install the device driver for the network card. Windows will detect that you have installed a new hardware. In most cases it will install the drivers automatically. If not, you need to install the drivers manually from the CD  supplied with the network card. I am using Windows 7 operating system to demonstrate each step. If you are using Windows Vista the steps will be very similar. If you are using Windows XP it will be slightly different so follow this guide instead.
Step 3: After the drivers have been installed successfully you can see a network card listed under windows device manager. To go to the device manager click Start -> Control Panel -> System and Security -> Device Manager.
You will see a network card listed under the device manager similar to the image below:
Step 4: Go to network sharing center by clicking Start -> Control panel -> Network and Internet -> Network and Sharing CenterAs you can see from the image below the computer name tiger is connected to a network and has access to the Internet. This indicates that our network card is installed correctly and managed to get connection to our network. In this case it is connected to a ADSL router.
Step 5: Check your local area connections by clicking  on change adaptor settings link on the left side of Network and Sharing center. You will get an icon similar to below:
Step 6: Double click on Local Area Connection icon which will display your LAN status. It shows the network connection duration, the speed of the connection, number of bytes sent  and received etc.
Step 7: Click Details to see the  Network connection details. You will see some very import connection details. Inside the red highlighted area you will see DHCP Enable is set to Yes and your IP Address listed. DHCP means (Dynamic Host Configuration Protocol). Basically its a feature built into most Routers or server operating systems which automatically assigns an IP address to the client computer. In our case the Router is the DHCP server and our computer is the client. Please note the dynamic IP address assigned by a DHCP server is random and can change next time you reboot your computer or the router.
Step 8: Close the Network connection details. Click Properties -> (on Network area connections status) -> Internet protocol version 4 (TCP/IPv4) -> Properties. As you can see everything is set to automatic. This means the DHCP server assigns everything automatically as mentioned above.
Step 9: If you have many computers on a network i.e. your Desktop PC, Your Laptop, and your PS3 console its a good idea to fix the IP Address for each device. This is called static IP address. By fixing the IP address you can easily identify each computer on the network. This is what i will do below. I will choose my IP address as 192.168.0.100. The subnet mask will be automatically set to 255.255.255.0.  Default gateway is 192.168.0.1. The gateway IP address is normally the IP address of your router. Preferred DNS server is also the IP Address of your router, although you can use other DNS server like Open DNS IP address.
Step 10: You can now check if the static settings have taken effect by clicking on Detailson Local Area connection status as you have done on Step 6. Finally you will see all the settings that you have made in the previous step has taken effect. You will notice that the DHCP enable is set to No, as we have set each value manually.
That’s it, you have managed to install and configure your network device successfully. You have also learned how to use dynamic and static IP Address to connect to a network
Retweet this story