Saturday, December 3, 2011

How to Burn an ISO Disc Image on Your Mac

Here's how to burn an ISO disc image on your Mac:
  1. Download the ISO image, if you haven't already.
  2. Open the Disk Utility application. (You can find it in Applications → Utilities.)
  3. Insert a blank DVD. You can also use a CD, but since most .iso images are large, plan to use a DVD unless the .iso image you downloaded is really small.
  4. Drag the .iso image to the sidebar of the Disk Utility application.
  5. Select the .iso file. The window shown below appears.
  6. Click Burn. The window shown below appears.
  7. Click the triangle button in the top right corner of the window to shown the burn options.
  8. Select the Verify Burned Data checkbox, if it is not already selected.
  9. Click Burn. Disk Utility burns the .iso image to the CD or DVD. Be patient - this can take a while.
Don't be surprised if the CD or DVD doesn't appear in the Finder after Disk Utility is finished burning it. Mac OS X can't mount many of the ISO images available for download. For example, the Finder won't recognize an Ubuntu installation DVD. Of course, that doesn't mean that you can't use the burned DVD on a PC.

Final Thoughts

You can also burn ISO images from the command line by using the Terminal application. Just type hdiutil burn image.iso where image.iso is the name of the ISO image. (Remember, you have to be in the folder of the ISO image. Use the cd command to navigate to the folder containing the ISO image.)
Another excellent option for burning ISO images is Roxio's Toast. Toast also has the unique ability to mount the burned DVDs in the Finder.
Retweet this story

Friday, December 2, 2011

How to Upgrade Your MacBook Pro's RAM In a Few Minutes

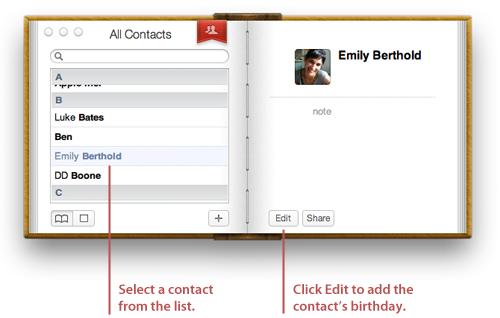
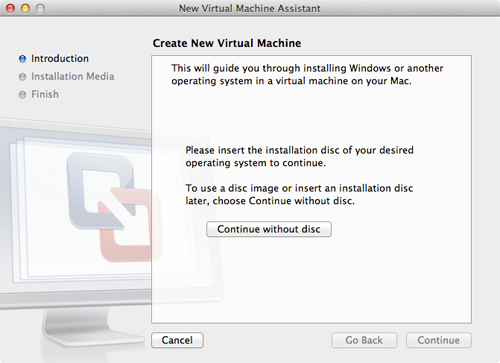
Upgrading the RAM is one of the cheapest and most effective ways to boost your computer’s overall performance. RAM, or random access memory, stores the code and instructions for OS X and any applications open on your Mac. Installing larger RAM modules in your MacBook Pro will allow you have more applications open at once and perform more tasks simultaneously. For example, you could open a bunch of memory-hogging applications while ripping a CD, watching a DVD, and uploading photos to the Internet - all at the same time. And if you install more RAM in an older MacBook Pro, you could see a big difference in the way your computer performs everyday tasks, like loading websites.
Note: These instructions are for the MacBook Pro only. The MacBook Air has RAM modules that are permanently attached (soldered) to the logic board, so you can't replace the RAM modules in any of the MacBook Air models.

How to Find New RAM

Different MacBook Pro models use different RAM modules, so before you do anything, find out which RAM modules your laptop accepts. 
RAM modules usually come in pairs. For example, the 2011 MacBook Pros come with 4GB of RAM, which is really a set of two 2GB RAM modules. To upgrade the RAM, you need to purchase a pair of larger modules, like two 4GB modules for a total of 8GB of RAM. (For the true geeks, Other World Computing also has 8GB modules available for a grand total of 16GB of RAM.) The modules in the pair should be the same size - you probably wouldn’t want to use a 2GB and 4GB module together.
Shop around for the best deal, and don’t buy the cheapest brand. Major retailers like BestBuy sell RAM, but it can be nearly twice as expensive as the modules available online!

Taking a Peek Under the Hood

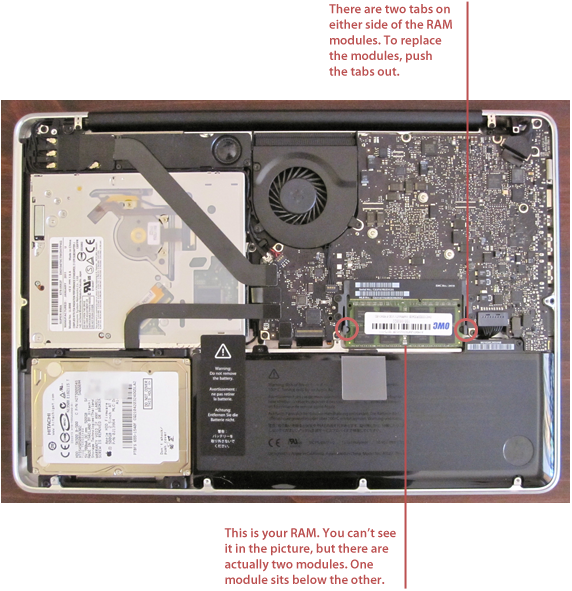
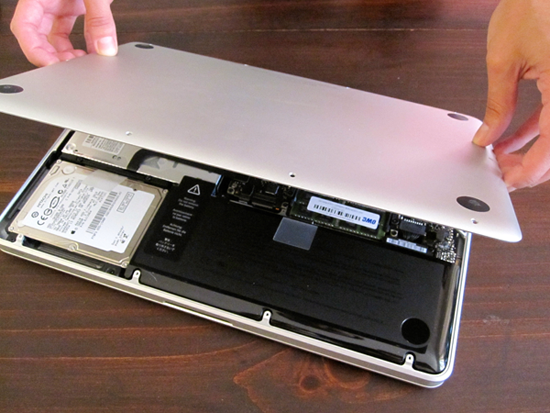
Your MacBook Pro has lots of internal components hidden under the case, as shown in the image below. You don’t want to touch most of these components—doing so could harm your Mac. When replacing your RAM modules, follow the instructions carefully and try not to touch any of the other components.
It's worth noting that the placement of components varies from Mac to Mac. Apple made the RAM and hard drive accessible in most models, but some Macs - like the Mac Mini - are notoriously difficult to upgrade. Fortunately, the MacBook Pro has RAM modules and a hard drive that are easy to replace.

Upgrading the RAM in Your MacBook Pro

Once your new RAM modules arrive, set aside about half an hour to perform the replacement. Be mindful of your environment. Static electricity discharges can zap components, so a fleece pullover isn’t the smartest thing to wear. Try to find a flat, clean surface to work on. And keep pets and children out of the way - you don’t want any hairballs or spilled drinks in your MacBook’s innards.
Here’s how to upgrade your MacBook Pro's RAM:
  1. Disconnect the power cord and turn your Mac over.
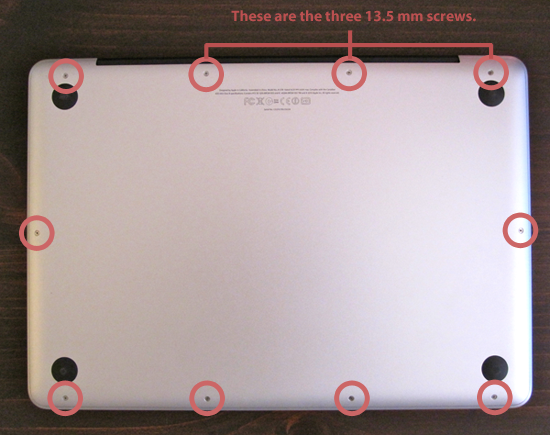
  2. Remove the ten screws on the back of the case. There are seven 3 mm screws, and three 13.5 mm screws, as shown in the image below. The screws are very small - don’t loose them!
  3. Gently lift the case backing and tilt it towards the rear of the computer, as shown below.
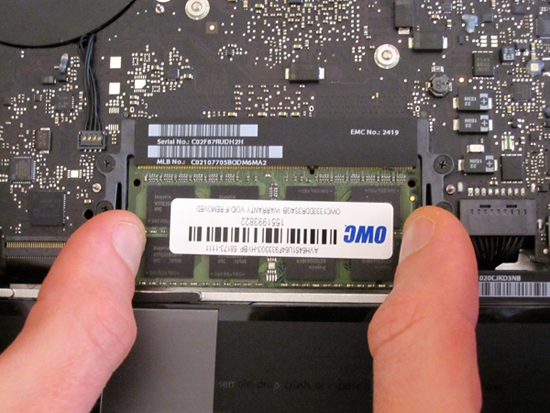
  4. Push out the tabs on both sides of the RAM module, as shown below. These tabs keep the RAM module firmly tucked in to the logic board - pushing them out causes the RAM module to pop up.
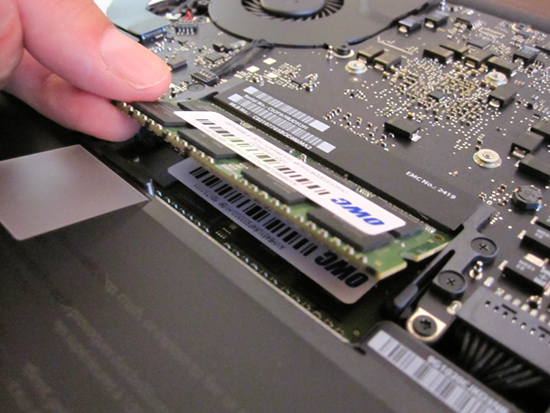
  5. After the RAM module has popped up, pull it back out of the socket, as shown below.
  6. There’s still another RAM module in there. Push out the tabs on both sides of the RAM module, just like you did for the first RAM module.
  7. After the RAM module has popped up, pull it back out of the socket.
  8. Now you can insert the new RAM modules. Take one of the new modules and firmly slide it in to the socket closest to the logic board.
  9. After the RAM module is set in the socket, press it down until it clicks in to the tabs.
  10. Repeat the process for the second RAM module. Insert it in to the top socket, and then press it down until it clicks in to the tabs.
  11. Gently place the case backing onto the top of the case.
  12. Replace and tighten the screws.
That’s it! Reconnect the power cord and start your Mac—you can check that the RAM is working by selecting About This Mac from the Apple menu.


Retweet this story

How To Use Mac To Remember Your Birthday

If you dread remembering birthdays like we do, you'll be happy to know that you can use Address Book and iCal to store birthdays for all of your contacts and display an alert on the screen when one rolls around. After you follow these instructions and set the whole thing up, the entire process will be automated. All you'll have to do is enter your contact's birthdays! The bad news is that you'll no longer have an excuse for not sending birthday cards.

Updating Address Book's Template

The  Address Book application on your Mac holds contact information for your friends, family, and coworkers. It's also capable of storing birthdays for all of your contacts, but that functionality is disabled by default. You need to modify the contact template before you can store any birthdays in Address Book.
Here's how to update Address Book's template to accept birthdays:
  1. Open the Address Book application. (It's in the Applications folder.)
  2. From the Address Book menu, select Preferences.
  3. Click Template. The window shown below appears.
  4. From the Add Field menu, select Birthday. The Birthday field should appear in the preferences window, as shown below.
  5. Close the Address Book preferences window.
Now you can add birthdays for all of your contacts in Address Book.

Adding Birthdays to Address Book

If you know your contacts' birthdays, you can enter them now. You can also enter them at a later point in time. When you're ready, here's how to do it:
  1. From the Address Book window, select a contact.
  2. Click Edit, as shown below.
  3. Enter the contact's birthday in the Birthday field, as shown below. You can use numeric or alpha-numeric characters (e.g., 9/5 or September 5). You don't need to enter the year the contact was born.
  4. Click Done. The contact's birthday is saved in the Address Book application.
Repeat this procedure for all of the contacts in your Address Book. Remember, you can add birthdays at a later date if you don't have them right now.

Setting iCal to Display Automatic Birthday Alerts

Storing birthdays in Address Book is only half the battle. Now you need to use the iCal application to automatically remind you when it's one of your contact's birthdays. By default, the iCal application will alert you at 8:00 AM on the contact's birthday, but that can be changed.
Here's how to set automatic birthday alerts in iCal:
  1. Open the iCal application. (It's in the Applications folder.)
  2. From the iCal menu, select Preferences. The window shown below appears.
  3. Select the Show Birthday Calendars checkbox.
  4. Optional: Change the "Day starts at" time to control when iCal displays alerts for birthdays. The default time is 8:00 AM.
  5. Close the iCal preferences window.
  6. Now iCal automatically displays all of your contacts' birthdays, as shown below. It will also display an alert on the day of a contact's birthday. Remember, by default the alert is displayed at 8:00 AM.
    You can modify an alert for a particular birthday by selecting it. This is useful if you want to set iCal to alert you one day before the contact's birthday, or to have iCal send you an email alert.
    That's it! Happy automated birthday tracking!
Retweet this story

How You To Switch To Mac Using VMware

VMware Fusion’s migration assistant for Windows makes it easier than ever to transfer your entire PC to your Mac and make the most of your Windows software investment. Get the best of both worlds and have access to your Windows programs and all your files from your old PC directly on your Mac, whenever you need them.

  • Designed for OS X Lion
  • Even More Mac-like
  • Turbocharged performance with up to 2.5x faster 3D graphics


Designed for OS X Lion

VMware Fusion 4 is designed for OS X Lion. The updated user interface makes working with your Windows applications quicker and easier. Launch Windows applications from LaunchPad,  move from Windows to Mac with a single swipe in Mission Control and beautiful high-resolution icons. It just works. VMware Fusion 4 is also compatible with Mac OS X 10.6.7 (Snow Leopard).Launchpad 
Optimized to leverage key technologies available in OS X Lion, VMware Fusion 4 lets you customize Launchpad to also include your favorite Windows applications so you can launch them in one click.


Mission Control
Optimized for OS X Lion, VMware Fusion enables your Windows applications to be viewed in Mission Control so you have a bird’s-eye view of not just your OS X Lion applications but all your Windows applications as well.


Full screen Windows Programs
With VMware Fusion 4, Windows programs can be viewed in full screen so every pixel of your screen real estate is utilized. You can even have multiple full screen Windows programs in Spaces and swipe between them.


Gestures Integration
Experience your Windows programs like Mac applications In Unity mode and use OS X Lion gestures to toggle between full screen Windows and Mac applications, access Exposé, show Launchpad, view Mission Control or show your desktop.
Ultrafast Resume
Just like OS X Lion's "resume" feature, VMware Fusion allows you to suspend Windows and resume it in even less time than before so you can get back to exactly where you left off without having to reboot Windows and waste precious time.

Even More Mac-like

VMware Fusion 4 enhances the way you experience Windows applications on a Mac. From the new App Unity feature, to the redesigned user interface, and Time Machine-compatible Snapshots, everything has been refined to give users an even more mac-like experience when running Windows applications on a Mac.Next-generation Unity 
App Unity now allows you to fully integrate Windows programs to OS X Lion by adding them to Launchpad, searching them using Spotlight or accessing them directly from the Mac applications folder.
Brand-new User Interface
VMware Fusion 4 has been updated to provide maximum productivity when working with Windows applications. From the installation experience, through disk management and snapshots VMware Fusion has been revamped to provide the most Mac-like experience. VMware Fusion just "gets out of the way" so you can be more productive.
Single Window mode has been completely redesigned to allow users to see more apps in smaller screens by removing the bottom status bar whilst adding access to key controls of the virtual machine in the top left corner.Taking cues from Mac System Preferences, Virtual Machine settings have been redesigned to offer an even more Mac-like look and feel.The new Virtual Machine Library in VMware Fusion 4 offers a fresh new look to better keep an eye on all your virtual machines and their respective status.

Time Machine Compatible Snapshots

Protect the state of your virtual machines by using Snapshots to capture the state of a virtual machine at any given time or at regular time intervals with the AutoProtect feature. The new Snapshot view offers a tree view of all your snapshots so you can better access them and go back to the Snapshot you want.
Snapshots are also Time Machine compatible so you can keep your Mac and all its virtual machines backed up without filling up your backup drive with unnecessarily files.


Better Performance. Faster Graphics. Outstanding Reliability.

With a highly optimized 64-bit engine and multicore processing faster than ever, VMware Fusion 4 will let you run Windows and Mac applications side-by-side at maximum speeds without sacrificing on reliability.
With more than 2.5x faster 3D graphics and support for OpenGL 2.1 and DirectX 9.0c Shader Model 3 graphics VMware Fusion 4 will make running highly demanding 3D applications like AutoCAD 2011 a breeze.

Great New Learning Center

Get the most out of VMware Fusion 4 with the new learning center. Learn how to get started, transfer your entire PC to your Mac or install a new copy of Windows through step-by-step easy to view video tutorials.

Lion Squared

VMware Fusion 4 now supports OS X Lion in a virtual machine. Get more from your Mac by running OS X Lion, OS X Lion Server, Mac OS X Snow Leopard Server and Mac OS X Leopard Server in virtual machines. VMware Fusion 4 is the best way to develop and test new applications for the Mac and iOS.

Encrypted Virtual Machines

Security is at the heart of VMware Fusion 4 with the ability to encrypt virtual machines and password protect them to provide another layer of protection around sensitive data.

Pause Feature

If you are running multiple operating systems at the same time and want to quickly free up valuable system resources for more important tasks, the new “Pause” feature will instantly pause the selected virtual machine and free up their CPU and RAM allocation without having to suspend or shut down.
Retweet this story

Mac: How to Install Ubuntu 11.10 in OS X Using VMware Fusion

Ubuntu, the popular open-source operating system that's easy to install and use. Trying out this Linux distribution on your Mac is easy. With an application called VMware Fusion, you can create a "computer within a computer" and run Ubuntu in a virtual machine on your Mac.
Here's how to install Ubuntu 11.10 in OS X using VMware Fusion:
  1. Download Ubuntu 11.10  It's a free download. Both the 32- or 64-bit versions work, but the 32-bit version is recommended.
  2. If you haven't already, download the  VMware Fusion application. There is a free 30-day trial available. If you decide you want to keep it, you can purchase it for $49.99 as of December 2, 2011.
  3. Open the VMware Fusion application.
  4. From the File menu, select New. The New Virtual Machine Assistant window shown below appears.
  5. Click Continue without disc. The window shown below appears.
  6. Click the Use operating system installation disc or image button, if it is not already selected.
  7. To install Ubuntu from the .iso file you downloaded, select Choose a disc or disc image... from the menu with the same name. The selection window appears. Select the .iso file you downloaded from the Ubuntu website, and then click Open. The .iso file appears in the menu as shown below.
  8. Click Continue. The window shown below appears.
  9. VMware Fusion analyzes the .iso file and automatically detects the operating system (Ubuntu) you are about to install. Click Continue. The window shown below appears.
  10. Note: There are two Ubuntu options in the Versions menu: Ubuntu for the 32-bit version of the operating system, and Ubuntu 64-bit for the 64-bit version. Make sure the version selected matches the .iso file you downloaded.
  11. The "Easy Install" option automates part of the Ubuntu configuration during installation. Enter your name, a username, and password (6 characters or longer) and VMware Fusion will provide that information to the installer to automatically set up your account in Ubuntu.
  12. If you'd like to be able to access the files in OS X from Ubuntu, select the the Make your home folder accessible to the virtual machine checkbox. By default, the virtual machine will only be able to read the files, not write to them. The Read only option is a security precaution designed to protect your files in OS X - the Ubuntu virtual machine will not be able to change or delete the files. On the other hand, selecting the Read & Write option allows you to save files to your home folder in OS X from Ubuntu, but it also raises the probability of accidents occurring.
  13. Click Continue. The window shown below appears.
  14. VMware Fusion displays a summary of the virtual machine you're able to create. By default, it will allocate 1GB of RAM and a maximum of 20GB of your computer's hard disk space to Ubuntu. (The virtual machine only uses the amount of space necessary - the base installation only consumes about 4GB of hard disk space.) You could customize these settings now, but it's not necessary right now - you can always change them later by selecting Virtual Machine → Settings after the virtual machine has booted. ClickFinish.
  15. You are prompted to save the virtual machine to your hard disk. Leave the file name and location set to the default settings. Click Save. VMware creates and boots the virtual machine. Ubuntu starts installing, as shown below. Go get a cup of coffee - this can take up to half an hour.
  16. Note: VMware Tools, the set of helper utilities for Ubuntu, should be automatically installed during this process. There is no need to install them after you log in for the first time.
  17. Keep an eye on the virtual machine. When Ubuntu is finished installing, you'll see the login screen, as shown below. Enter your password and press Return. You're logging in to Ubuntu!
  18. Now you're in Ubuntu. Don't worry if it looks a little weird at first. It takes VMware Tools a couple minutes to detect your screen's resolution and adjust Ubuntu accordingly. Once the resolution has changed, you can click the "Dash home" button in the top-left corner to play around with the new  unity user interface, as shown below.
  19. One thing you'll want to do right away is install updates for Ubuntu and the installed applications. To do that, click the gear menu and select Updates Available, as shown below. We had over 250 updates to install!
After you install the updates and restart the virtual machine, you're ready to rock and roll. Ubuntu is yours to discover!
Retweet this story

How to Use Your Mac as a Wireless Router

If you’ve recently purchased an iMac (or any Mac, for that matter), chances are it came with a built-in AirPort card that allows you to connect to the Internet wirelessly. If you have cable or DSL service, but have yet to purchase a wireless router, then you’re in luck! You can turn your iMac into a wireless router for your home or small office. This allows you connect several computers to the Internet -- all via your Mac's wireless network!
Here’s how to do it:
  1. Take a look at this basic diagram of what's needed. You'll need a cable or DSL modem (which is typically provided by your Internet service provider);
    a Mac (with a built-in AirPort wireless card) which is connected to your modem via an ethernet cable; and any number of portable and/or desktop computers which have wireless capability.

  2. Next, you'll need to configure your Mac (the one connected to your modem) to share its Internet connectivity with other wireless devices. To do this, select System Preferences from the Apple menu, and then click on Sharing.

  3. In the Sharing window, click on the Internet tab to bring up Internet
    Sharing. Select Built-in Ethernet from the Share your connection menu. Then, select Airport in the “To computers using:” list.

  4. Click on the Airport Option button to configure some wireless security options. You probably don’t want to be sharing your wireless connection with the whole neighborhood! Enter a WEP password, which will be required from the others wishing to join your new wireless network.

We've found this to be an excellent solution for folks who don’t have a wireless router, but would like occasional wireless access in their home or small office.
Retweet this story

Thursday, December 1, 2011

How To Use Your iPod as a Removable Hard Drive For Your Mac Book

If you own a Mac (or any computer for that matter), chances are you'll eventually have to transfer files to another computer. And you'll probably want to back up your irreplaceable files and data, too. For these relatively trivial tasks, we recommend that you use your iPod. After all, your music, movies, and pictures probably take up less than half of your iPod's hard drive space. You can use some of the free space as a storage device! It's easy to set up and use.
Here's how to do it:
  1. Connect your iPod to your Mac.
  2. Open iTunes if it isn't already running. Select your iPod in the left-hand sidebar.
  3. From the Summary tab, select Enable Disk Usage.
  4. Now, in the Finder, you'll see your iPod mounted as a hard drive.
    Copy whatever you want onto your iPod: File, folders, applications. Your iPod will take them all.

What Is It Good For?

Using your ipod as a storage device allows to you transfer stuff to other Macs and PCs. You can back up your data, move files and folders, and even transfer music copied onto the hard drive.
Don't let the storage device feature confuse you: You can't use your iPod to access data you copy onto your iPod. The files are on there, but you wouldn't know it by using your iPod. Even if you copy music onto your iPod through the Finder, you won't be able to access it through the iPod's interface.
You can also use your iPod as a start up disk. Tech Tool Protogo ($135) allows you to install multiple versions of Mac OS X quickly and easy.
However, we strongly recommend that you do not use your iPod as a start up disk. Your iPod's hard drive is different from regular hard drives - it is not designed to operate as a start up disk. Using it as such could damage or even destroy your iPod. If you do decide to use your iPod as a start up disk, try to limit its use to 45 minutes or less.

Retweet this story