Friday, January 27, 2012

Motivational words & Inspirational Quotes:The champion’s edge is not in a gifted birth

The champion’s edge is not in a gifted birth; a high Intelligent Quotient (IQ) or in talent. The champion’s edge is all in the ATTITUDE (how you do what you do); not aptitude.

How you do what you do determines the quality of the results you get in your life.
It is what you do after you’ve done what you are expected to do, that will make you a CHAMPION.

It is what you learn after you’ve learnt what you are expected to learn that will make you a GENIUS.
It is how many people you help to become successful after you become successful that will make you live a life of SIGNIFICANCE.

It is the EXTRA that you do after doing the ordinary, that will make you to become EXTRA-ORDINARY.


SUBMITTED BY GUEST BLOGGER
eddy line, UK
Retweet this story

How To Access Shared Folders in a VirtualBox Ubuntu 11.04 Virtual Machine

00_shared_folder_in_nautilus
Have you installed Ubuntu 11.04 as a virtual machine in VirtualBox but have had problems getting the Shared Folders feature to work? We were able to add a shared folder, but were unable to access it.
We found the secret to accessing shared folders in an Ubuntu 11.04 virtual machine in VirtualBox. VirtualBox adds a user group called “vboxsf” to the Ubuntu 11.04 virtual machine. Any user that needs to have access to shared folders defined for that virtual machine need to be a member of that group. This article shows you how to add a user to the vboxsf group.
Setting up shared folders in VirtualBox is fairly straightforward. Select Shared Folders from the Devices menu.
The Shared Folders screen on the Settings dialog box displays. Use the buttons on the right side to add folders from your host machine to the Folders List. Refer to the help in VirtualBox for more information about adding shared folders.
Once you have added your shared folders in VirtualBox, you must add users in the Ubuntu 11.04 virtual machine to the vboxsf group created by VirtualBox. To do this, select Administration | Users and Groups from the System menu in the Ubuntu virtual machine.
On the Users Settings dialog box, click Manage Groups.
The Groups settings dialog box displays. Scroll down in the list of groups and select the vboxsf group. Click Properties.
On the Properties box for the vboxsf group, select the check boxes in the Group Members box for the users you want to add to the vboxsf group and click OK.
To make this change, you must provide authentication. Enter your user account password in the Password edit box and click Authenticate.
You are returned to the Groups settings dialog box. Click Close and then also click Close on the Users Settings dialog box.
Now, you should be able to access your shared folders in the /media/sf_Ubuntu_11.04 folder.
NOTE: The name of the folder inside the media folder that contains the shared folders in VirtualBox always starts with “sf_” and continues with the name of your virtual machine.
Remember to add any new users you add to your Ubuntu 11.04 virtual machine to the vboxsf group if you want them to be able to access the shared folders.
SUBMITTED BY GUEST BLOGGER
suhi, southkorea
Retweet this story

How to change the screen saver in Windows 7

Step one
From the Start Menu, select Control Panel.
Step two
Click on Appearance and Personalization, and from the options displayed under Personalization, select Change Screen Saver.
Step three
Using the drop down menu located under Screen Saver, choose one of the default images to have displayed when your PC is idle. You can also elect to have random images from your Photo Library or Windows Live Photo Gallery displayed on your screen instead.
Step four
If you select the Windows Live Photo Gallery option, press Settings and you can opt to display only photos with certain descriptive tags, ratings or change the location where images are taken from and even how fast or slow they're displayed. Meanwhile the Photo Libray settings only offer you the chance to adjust the slide show speed, the location images are taken from and whether they appear in a random order or not. The 3D Text screen saver also offers customisable settings. You can change what the text reads, the font and the colour along with the speed it scrolls across the screen at. It's worth noting that none of the other Windows 7 default screen savers have adjustable settings.
Step five
Use the Wait box to adjust how long the PC should be left idle for before the screen saver begins. You can also preview how your screen saver will look before you save the changes. If you're happy with the way it looks then press Apply followed by OK to close the window.


SUBMITTED BY GUEST BLOGGER
jorge, mexico
Retweet this story

Thursday, January 26, 2012

How To Access Windows Home Server from an Ubuntu Computer on your Network

If you’re a Windows Home Server user, there may be times when you need to access it from an Ubuntu machine on your network. Today we take a look at the process of accessing files on your home server from Ubuntu.
Note: In this example we’re using Windows Home Server with PowerPack 3, and Ubuntu 10.04 running on a home network.
Access WHS from Ubuntu
To access files on your home server from Ubuntu, click on Places then select Network.
sshot-2010-06-05-[20-11-11]
You should now see your home server listed in the Network folder as well as other Windows machines…double-click the server to access it.
If you don’t see your server listed, you might need to go into Windows Network \ Workgroup and find it there.
You’ll be prompted to enter in the correct credentials for WHS just as you would when accessing it from a Windows machine. It’s your choice if you want to have the password remembered or not…make your selection and click Connect.
Now you will see the available folders on your home server. In this example we signed in with Administrator credentials, so we have access to everything.
Double-click on the folder share you want to access content from…here we see MS Office documents on the server.
Or, here we take a look at a music folder with various MP3 files which you can make Ubuntu play.
You can access the files directly from the server, provided there is a Linux app that can handle the file type. In this example we opened a Word document in OpenOffice.
Here we’re playing an MKV movie file from the server in Totem Movie Player.
 
You can easily search for files on the server as well…
If you want to store your Ubuntu files on WHS it’s just a matter of dragging them to the correct WHS folder you want them in.
If you’re using an Ubuntu computer on your home network and need to access files from Windows Home Server, luckily it’s a straight-forward process. You’ll often have to find the correct software to use Windows files, but even that’s getting much easier with version 10.04.
    SUBMITTED BY GUEST BLOGGER
    
    sammy, brazil


Retweet this story

How to Burn a Music CD in iTunes

Here's how burn a music CD in iTunes:
  1. Open iTunes. (It's in the Applications folder.)
  2. Create a new playlist and select it, or just select an existing playlist.
  3. Note: Most CDs allow you to burn about 77 minutes of music. Don't worry about adding too much music to your playlist. Later, when you try to burn your CD, iTunes will let you know if you've put too many songs in your playlist. If that happens, you'll have to remove songs from your playlist by selecting them and pressing the Delete key. (This only removes the songs from your playlist, not your library.)
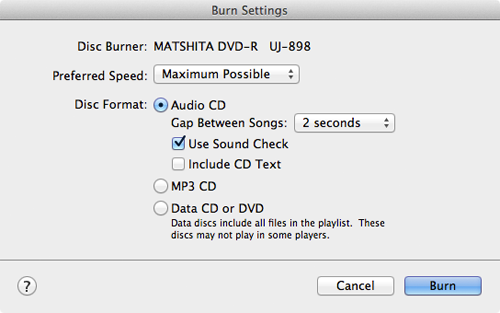
  4. From the File menu, select Burn Playlist to Disc. The Burn Settings window appears, as shown below.
  5. Select Audio CD. This tells iTunes to create a regular music CD that can be played in any CD player.
  6. Select the Use Sound Check checkbox. This feature automatically levels out the volume of every song on your CD to ensure you're not "blown out" by songs that were recorded at a higher volume than others. Be sure to enable this if you want all the songs on the CD to play at the same volume.
  7. Click Burn.
  8. iTunes prompts you to enter a blank CD, as shown below. Put one in your Mac's CD drive.
  9. iTunes burns the CD. You can watch the progress in the iTunes status display, as shown below.
  10. You'll know iTunes has finished when your new CD appears in the sidebar, as shown below.
  11. SUBMITTED BY GUEST BLOGGER
    
    monika, poland
Retweet this story

Wednesday, January 25, 2012

Tablets computer gives you a pain on the neck

Users of tablet computers should place their device on the table and tilt its screen to avoid neck pain
wednesday january 25, 2012

Users of tablet computers should place their device on the table and tilt its screen, rather than have it flat on their lap, to avoid potentially painful hunching of the neck, a study suggested Wednesday.
"Tablet users may be at high risk to develop neck discomfort based on current behaviours and tablet designs," it warned.
A team led by environmental health researcher Jack Dennerlein of the Harvard School of Public Health asked seven men and eight women who were experienced tablet users to carry out tasks on an iPad2 and a Motorola Xoom.
Using a motion-analysis system, the team filmed the 15 volunteers as they worked on the tablet in four common configurations.
In the first position the tablet was not placed in its proprietary case but held on the lap in one hand while the other was used to touch the screen.
In the second the tablet was placed on the lap, but stayed in its case. The user worked with both hands on the screen.
In the third, the tablet was set up in its case on a table, with its screen set at a lower angle, and the user worked with both hands.
The last configuration, dubbed "table-movie," entailed placing the tablet on the table in its case, tilted at a higher angle. The user did not work on the screen and instead watched movies or other programming on it.
The experiments showed the angle of the head and neck varied hugely across the four configurations and between the iPad and the Xoom.
Compared with the Xoom, the angles were more acute in the iPad, which the researchers attributed to the different case designs.
The study found that tablet users generally had more acute angles of head and neck flexion than with desktop or notebook computers.
Only when the two tablets were in the "table-movie" configuration -- when the screen's angle was at its steepest -- did the user's posture approach a neutral position.
"This suggests that tablet users could place the tablet higher, on a table rather than a lap, to avoid low gaze angles, and use a case that provides steeper view angles," the scientists said.
A 2009 study found that the "gaze angle" for looking at computers should be roughly 45 degrees or more to avoid straining the neck's extensor muscles.
The gaze angle is calculated as the downward direction of the eyes in relation to the horizontal.
The paper, published in the accident-prevention journal Work, did not assess the impact of tablet use over a long period, nor did it address the positions of the arms, wrists and hands, an issue it said needed further research.
But it noted that tens of millions of tablet computers have already entered circulation and there remained no posture guidelines for using them safely.
The history of ergonomic science is littered with designs, from car seats to office desks and phones, that can cause discomfort or even pain if the user uses the wrong posture over time. 
Retweet this story

Motivational words & Inspirational Quotes:“Never get into the habit of doing time. Make every day in your life count for something.”

“It is a fact that the person who does not make an effort to perform at work is not the kind of person who will make an effort to perform when it comes to their own dreams, if they have any dreams to start with.”

“Your best bet to survive and excel is on yourself and your ability to adapt to change.”

“Never get into the habit of doing time. Make every day in your life count for something.”

Retweet this story