Tuesday, November 29, 2011

How to Update Mac OS X

Updating a Mac's system software is an important maintenance task that every Mac user should perform periodically. Using the newest versions of Mac OS X and other Apple applications can protect you against malicious attacks, adverse system performance, and strange bugs that can cause applications to randomly freeze and crash. The first step is to automate Software Update, and the second step is to actually perform the software update.

How to Automatically Check for Software Updates

You can, of course, manually check for updates with Apple's built-in Software Update tool. But it's much easier to simply automatic the process and have Software Update notify you when it's found updates. Here's how to set Software Update to automatically check for updates:
  1. From the Apple menu, select System Preferences.
  2. Select Software Update.
  3. Make sure that the Check for updates checkbox is checked. Select a short time interval, such as daily or weekly.
  4. Close System Preferences. You've successfully configured Software Update to run automatically.

How to Run Software Update

To actually update your software, you'll need to run Software Update. Here's how:
  1. From the Apple menu, select Software Update. Your Mac will connect to Apple's servers to search for new software.
  2. If new software is available, quit all running applications and unplug unnecessary devices from your Mac (such as USB hubs), and then click Install Items.
  3. Software Update will download and install your new software. Depending on how much software you're installing, this process could take a while. When it's finished, you'll need to quit Software Update. You may need to restart your Mac.

that is all !!!!
Retweet this story

Monday, November 28, 2011

How to Upgrade Your MacBook's Hard Drive

Upgrading your MacBook's internal hard drive is a simple way to store more documents, music, movies, applications and other files on your new Apple portable.Hard drives (or hard disk drives) are large capacity storage devices which store all of your data - everything from Mac OS X to your latest iTunes music album. Adding a larger capacity internal hard drive will allow you to store more data without having to plug in external devices. This can also help alleviate slow-downs, errors and other weirdness that can occur when your hard drive starts to get full. It's generally recommended that you keep 5% or 5GB of space free (whichever is larger) to alleviate such issues. If you're running out of space, it's time to consider an upgrade! Note that before we start this , please make your backup first.

Making Your Backup

Before you take your factory-installed hard drive out of your MacBook, think about what will go on the new one. Do you want everything as it was when it left the factory? Would you like to keep your own applications and documents? Perhaps a little bit of both? If there is anything on your drive you want to keep?.
Why Do I Need a Backup? What Software Do I Use?
Since upgrading your hard drive involves replacing the unit which contains all of your data (i.e., email, documents, applications, etc.), you are going to lose anything and everything on your MacBook. Backing up to an external hard drive first will create a copy of this data - a copy which you can move to the new drive.
Additionally, it's good practice to backup your data in case your hard drive fails or a file becomes corrupt, and this is as good a place as any to get into the habit.Choosing backup software is your first step. We'll be using Super Dumper from  Shirt-Pocket Software.This is a very popular, easy to use and free application with additional features you can unlock for the relatively small cost of $27.95.
Choosing a Backup Drive
There are many factors to consider when choosing a backup hard drive. Firstly, (and often most importantly) there is the fact that Mac OS X can use an external hard drive connected with FireWire (either 400 or 800, depending what kind of Mac you have) to boot from as if it were using the internal hard drive. This can be very handy if you have a need to start your Mac in the middle of this upgrade process, or when your internal drive fails.
All MacBooks have a FireWire 400 connector, but no FireWire 800 connector.
Of course, you also want to choose a drive with at least the same capacity as your internal drive so you have room to back up everything. Most MacBooks ship with a 60GB hard drive, but you may want a larger drive than that. A 160GB drive is the most common size for backups of home machines.
How to Backup Your Mac
  1. Turn on your backup hard drive and connect it to your Mac. Launch SuperDuper! (which you will already have downloaded from Shirt-Pocket Software). You can find it in your Applications folder.
  2. SuperDuper! asks you to choose two locations. You will want to copy Macintosh HD (your current internal hard drive as shown on your desktop) to your external hard drive which will also appear on your desktop, now that it's plugged in and switched on. Using the default option of "Backup - all files" will automatically create a boot-able backup, one which you can later boot to as if it were your internal drive. This is great if you want to test something, have a fully cloned system to revert to (should the worst happen), or in this case, to copy to your new drive without loosing a single setting. Click the Copy Now button, and then click Copy in the next dialogue box.
  3. Sit back and wait. Once the copy is complete, you will have what's known as a full boot-able backup. Now you can do whatever you want to your internal hard drive - your data is safety stored on your new backup drive! Just to make sure, it's always worth booting to that drive and checking that everything went according to plan. It only takes a minute, and it's better to do it now rather than find it didn't work.
  4. Restart your Mac. While it starts, Hold the Option(Alt) until a display appears. This asks you to choose a hard drive to boot from. Clicking on your backup, and then clicking on the arrow below it, will tell your Mac to boot to the backup. You'll know that you have successfully booted to your backup rather than your internal drive because the backup will now appear at the top of your Finder window side panel, like so:
Now that you have everything backed up, it's time to install your new hard drive!
  1. Turn your MacBook upside-down, with battery side near you. Use a coin to turn the lock slot to the unlock position. This will allow you to remove the battery.
  2. Inside the bay, there is a small L-shaped bracket running down the left and far edges. This is removable with a Phillips #0 screwdriver. Unscrew the three screws along the far (longer) face. Don't be fooled: these screws are not removable from the plate itself. Once unscrewed, the plate should pull out very easily.
  3. Now you can see the memory (RAM) modules behind the long side of the plate (we will leave these for the moment) and a small white tab on the left (behind the shorted side of the L-Shaped bracket). Pull the tab to release the hard drive from its slot and pull it free from the computer.

    The memory (RAM) slots.

    The hard drive tab.

    The hard drive half way out.

    The hard drive fully removed.

  4. When you compare the new and original drives, you will notice that there are 4 small pegs (2 on each of the longer sides) of the original hard drive. These perform two functions. First, they hold the EMI (Electromagnetic Interference) shield on, which is the silver shield covering the delicate underside of the drive (the one you don't want to touch). Second, they guide the drive into its bay and hold it in place.
    Using your Torx T8 screwdriver, unscrew these pegs, move the EMI shield to the new hard drive and hold it in place with the 4 pegs. Make sure the EMI shield's tab, which you used to pull the drive out, is facing the front (clean side without any connectors) before screwing the pegs in.
  5. Now you can push the drive back into its bay (EMI shield facing up, tab facing out, connectors facing in) and replace the L-shaped bracket. You may need to use the Philips screwdriver to gently and carefully push the foam pads on the back of the plate down to allow it to sit flush against the unit before screwing it in place.

    Replacing the hard drive (note the position of the EMI shield tab).

    Make sure to push to the foam pads down so the "L-shaped" bracket sits flat or you won't be able to put the battery back in.
  6. Fit the battery back in its slot, and then use the coin to lock the cover in position.
Turn your MacBook over. You're ready to continue onto the next section!

Restoring Your MacBook

This section is primarily aimed at those who have created a boot-able backup (as explained earlier) and would like to restore from that backup. This will allow you to get back to where you were with your last hard drive - all of your software updates, data, and music will be there.
If you would like to restore from the factory Restore Disks and save some space while still retaining your user account, you can follow the points at the end of the section, but the two procedures are quite similar. Both options are similar in nature and will suite the needs of different people. Read through both, see how it works out and decide for yourself which is right for you. Either way, the procedure for partitioning your drive with Disk Utility is the same.
Preparing Your New Hard Drive
The first thing you will want to do is to turn on your computer, but at present the drive you have just installed won't show up on your desktop (assuming you could boot to a desktop). First, the hard drive needs to be formatted and partitioned, and doing so from a backup is very simple. We'll assume your backup was made using the standard settings of the SuperDuper! backup application from Shirt-Pocket Software and that it was made to a FireWire 400 external hard drive.
Start by connecting and powering up the external drive. Now you are ready to turn on the MacBook. As soon as you hit the power button, you must hold down the Option (or Alt) key. This will produce a display offering the option to boot to all boot-able devices connected to the MacBook. There will likely be only one: the backup you made to your external drive. Select it, and then click the arrow button to continue to boot from this device.
Partitioning Your New Drive
Once your Mac has booted to the desktop, you'll probably see a message asking if you wish to initialize a device. If this does appear, you will choose to Initialize, but if it doesn't you will want to launch Disk Utility, which can be found in the Utilities folder inside the Applications folder. Either way, you should be greeted by a display looking something like this:
Select the new hard drive listed at the top of the left-hand column, and then select the Partition tab. Choose the number of partitions you want from the drop-down menu (currently stating Current) as 1 Partition. Next, you will want to rename your drive to something other than Untitled. By default, Apple calls this Macintosh HD, but we will choose MacBook HD just to be different.
Using the Options button at the bottom, make sure that GUID Partition Table is selected (this is the new standard by which Intel Mac hard drives can be found as boot-able devices, which you will want as it will be your main hard drive) and click OK. Now click Partition, and when the dialogue box appears, click Partition again. Wait a few seconds while you watch the blue progress bar flash from left to right, and then notice that the name you selected for your drive is now displayed below the manufacturers name in the left-hand column. You now have yourself a usable, formatted, partitioned drive. Easy, huh?
Restoring from your Backup
Now you can close Disk Utility. SuperDuper! will recognize the new drive, so you open SuperDuper!. Using the same settings as before (only in reverse), you can restore the backup you are currently using to the new drive. You will want to copy from your external hard drive to MacBook HD which will also now appear on your desktop. Once the transfer is complete, you're ready to go!
Reboot your MacBook once again, holding the Option (or Alt) key to choose the internal hard drive. Click the arrow button to boot from it. You're done!
If You Don't Have a Boot-able Backup, or Wish to Use Your Restore Disks
Start by turning on the MacBook and inserting Restore Disk 1. As soon as you hit the power button, you must hold down the Option (or Alt) key. This will allow you to boot to all boot-able devices connected to the MacBook. There will likely be only one: the restore disk you just inserted (it may take a minute to show up. If it doesn't, try holding the power button until the machine turns off, and power it back on again holding the Option key). Select it, and then click the arrow button to continue to boot from this device.
Once the machine has booted to the Restore Disk, you can choose your language. After the next screen appears, you will notice a familiar looking Menu Bar across the top of the screen. Under the Utilities menu, you should see the Disk Utility application. Selecting this option will allow you to follow the same instructions for performing this procedure as if you were booted to a backup drive.
Once you have partitioned your drive, you can close Disk Utility. Your new hard drive will now be fully recognized by your MacBook. Continue to walk through the on-screen instructions for installing Mac OS X 10.4 Tiger to complete the process. If you want to really show off, you can click the Customize button in the bottom of the window part way through this process to choose not to install certain bundled applications, language packs you won't use, and so on. Deselect all of them to slim down the space required to install Mac OS X 10.4 Tiger to a mere 2GB! This is the real benefit of the fresh installation over using SuperDuper! to restore, however, you can always use the Migration Assistant to recover your user account to a fresh installation if you previously backed up using SuperDuper!


Retweet this story

Saturday, November 26, 2011

China Top The World On E-commerce

Where do you think, the next  amazon, e-tailer is going to be ?
China, already home to the world's largest online population, is likely to replace the United States as the biggest e-commerce market by 2015, looking at new research.
China's e-commerce market is currently worth $74 billion -- less than half that of the United States at $177 billion
But it is growing rapidly, spurred by increasing Internet use -- China now has an online population of more than half a billion, which is almost the combine population of European Union -- the low cost of shipping and a passion for shopping among China's growing middle class.
"Consumerism is already big in China -- people simply love to shop. Beyond this, the Internet is affordable, and thus widely available," said the report, based on surveys of more than 4,000 online shoppers across the country.
"China... already has 145 million online shoppers, with exponential growth expected that could bring the number to 329 million by 2015 and make the e-commerce market in China the world's most valuable."
Within five years, online shoppers in China will be spending an average $980 per year -- twice what they spend today and close to the US average of $1,000, said the report, issued Tuesday.
Up to a quarter of e-commerce demand is for products consumers cannot find in physical stores -- a circumstance unique to China, whose huge size limits the coverage of physical retailers, it said.
The e-commerce industry benefits from China's low cost of shipping -- one dollar on average to ship a one-kilogramme parcel, versus six dollars in the United States.
E-commerce in China will go from representing 3.3 percent of the country's total retail value today to 7.4 percent in 2015, an expansion that took the United States a decade to achieve. 
What are your comments?, to leave a comment,  use the join this site, with google  friends button on your  right hand side bar of this site.
Retweet this story

Tuesday, November 22, 2011

Replacing the battery of your motherboard (CMOS battery)

A computer may sometimes show error messages related to time and date options or other errors like 'no operating system or new CPU is installed'. All these are indications that it is time to change the battery of the motherboard i.e. the CMOS battery of the system. The depletion of this batteryhappens and hence it must be replaced ideally every five years. The replacement process has to be carefully followed to avoid any inadvertent problems. Saving the BIOS data prior to the battery change and configuration of the same, after the installation of the new CMOS battery, must also be done properly.

Replacement sequence

It is recommended that you change the CSMOS battery every 5 years. 

Saving the BIOS data

Open all the BIOS screen and note all the information on a piece of paper. It's important that you don't make any modifications. Once completed this document will be useful to check out if all the parameters are correctly inserted after replacing the battery. 

Identify the CMOS battery

The CMOS battery is some kind of round shape button, thin in diameter, sometimes it can be hidden by extension cards or connectors or on old PC it has a cylindrical shape. 
The battery model most widely used is the CR2032:
  • Where :
    • CR- lithium battery
    • 20 - 20mm diameter
    • 32- Thickness 32* 0.1 mm
  • This type or battery is easily found and has an average price of 4 to 5 Euros


How to locate it:
  • Turn off your PC
  • Remove the power cable attached to your System unit and remove the hatch.
  • Discharge your System Unit from static electricity by touching it with a metallic object.


Removing the discharged battery

  • First of all be sure that your System unit is laid down horizontally.
  • The +ve pole of the battery should be visible.
  • Remove the battery, but avoid any forcing and any contact with other parts of your motherboard (refer to the manual provide with your motherboard).
  • Go to your local retailer any buy a battery of the same model or something equivalent.


Installing the new battery

Be sure that the battery is place correctly (firmly) in the slot allocated (positive side visible, depending on the model of your motherboard). 

Verify the BIOS data and resetting the clock

  • Once the operation complete, it is important to configure the BIOS settings.
  • Start your PC.
  • Enter the BIOS.
  • Modify the Date.
  • Verify if the parameters are the same as the one noted in step 1(perform any modifications needed)
  • Save and quit BIOS.
Retweet this story

The latest SQL injection attacks vulnerable websites

More than 180,000 pages have already been infiltrated by a mass SQL attack, called jjghui. Named according to the website where traffic is redirected to, this attack is targeting small legitimate websites that don’t pay much attention to their security and sometimes have security vulnerabilities inside the system. Attackers use SQL vulnerabilities to inject malicious JavaScript which helps to fool people into buying fake software and gives direct access to all the data which is stored on the infected webpage as well.
As soon as malicious JavaScript code is injected, it allows the attacker to execute its script code from jjghui.com and infect victim’s computer with malware. In the final, attacker becomes capable to execute almost every command or program on the infected computer, steal usernames, passwords, credit card numbers, delete and modify database information and even gets ability to access to the local network. After checking on Whois entry, jjghui.com is said to be owned by mysterious James Northone who also has LizaMoon.com used for the LizaMoon attacks this spring. Security experts recommend employing database activity monitoring practices to prevent such SQL injections and fixing all SQLi vulnerabilities on the site.
More safety tips: net-security.org
Retweet this story

Pass words to avoid using

You may have heard about those hackers who managed to get into Slovakia’s National Security Bureau about five years ago. Always been abbreviated as NBU, it has tons of information stored on it, so protection of such website is especially important. However, this website was an easy hack because the login/password of NBU was simply nbusr/nbusr123!
No matter that all this was five years ago, people continue to create and use bad passwords. According to millions of stolen passwords that have been published by hackers on the Internet, most of them include sequential numbers, like 54321, or classic words or phrases, such as ‘monkey’ or ‘letmein’. According to a data of password management app maker SplashData, here is a list of the 25 worst passwords of 2011:
1. password; 2. 123456; 3. 12345678; 4. qwerty; 5. abc123; 6. monkey; 7. 1234567; 8. letmein; 9. trustno1; 10.dragon; 11. baseball; 12. 111111; 13. iloveyou; 14. master; 15. sunshine; 16. Ashley; 17. bailey; 18. passw0rd;19. shadow; 20. 123123; 21. 654321; 22. superman; 23. qazwsx; 24. Michael; 25. football.
In order to make a strong password, you must choose unique one which will never come into hacker’s mind. Besides, make sure you use different passwords everywhere to avoid being hacked on several websites at the same time. Security experts also recommend changing passwords and never share them with others.
Source: pcmag.com
Retweet this story

Monday, November 21, 2011

How to fix Google Redirect Virus (browser hijacker) problem

Google redirect virus is a browser hijacker targeting google and other search engine search results and redirecting user to infected pages. These pages can be porn–related or full of advertising banners that make creators of this parasite money. Also, these pages  might force you to pay something or give away your bank account details. Thus Google redirect virus is quite dangerous.
There are couple different streaks of Google Redirect viruses, and some of them might require heavy scanning with reputable Anti-malware solution like NOD32 Antivirus, Kaspersky, Spyware Doctor, Malwarebytes. Sometimes Google results Redirect virus even blocks reputable sites and it is tough to download automatic software. However, there are couple easy steps to solve less complex problems.
Note, that before trying to fix other things, you are suggested to scan and check if anti-malware programs can identify more precise reason of Google redirect hijacker. You should always scan after performing all these steps as well, as doing anti-rootkit scan might reveal trojans that were hidden due to other infections.
Steps 1-5 deals with regular hijacking of search results that are due to malicious settings or plugins.  If any of antivirus programs are stopped from execution this means malware infection and you will have to scan your PC with anti-virus and anti-malware programs.
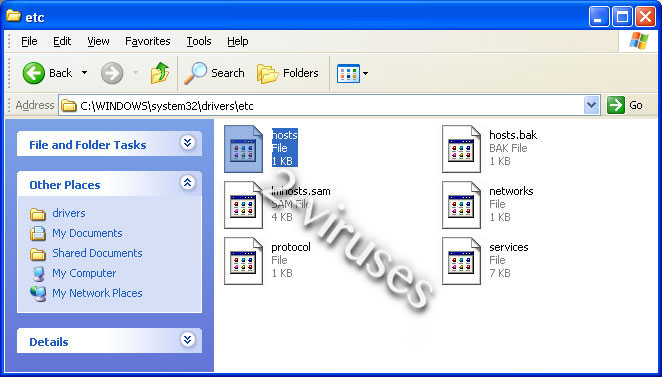
Step 1. Check your hosts file for malicious entries.
Hosts file resides on C:\Windows\System32\Drivers\etc\hosts
Windows hosts file location
Where Windows is your windows installation directory. On windows 7/vista, you should open your hosts file with administrative privileges. Google Redirect virus symptoms might be result of malware adding malicious entries to this file and are removed easily as well.
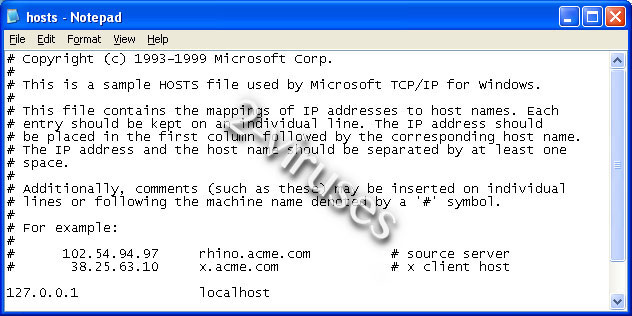
Hosts file should look like this: (open the file with Notepad)
Windows hosts file
If you see more lines of code and IPs, you should delete these, especially if they rewrite google or Microsoft subdomains. This is a sign, that you either had or have infection on your PC, as this file can not be accessed remotely usually.
Step 2. Check DNS (Domain Name Server) settings
Domain name servers are used to determine what server to access when opening website addresses. Hijacking these settings would allow hijacking various websites including search ones.
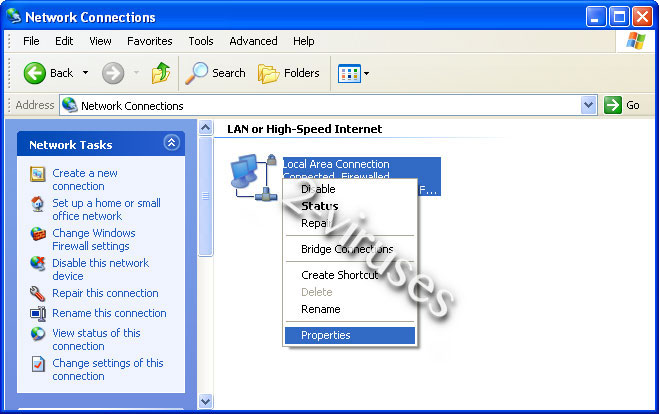
1. Go to Control Panel->Network Connections and select your local network.
2. Right-click your local network icon and select Properties.
Local Area Connection properties
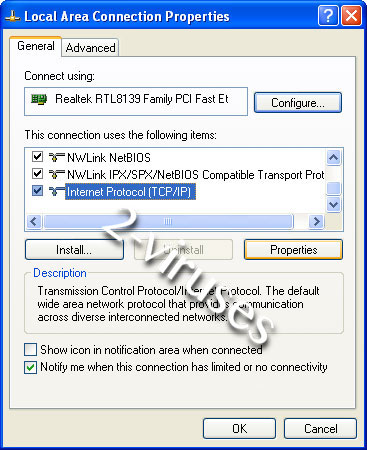
3. A window will open, then select Internet Protocol (TCP/IP) and click Properties.
Internet Protocol properties
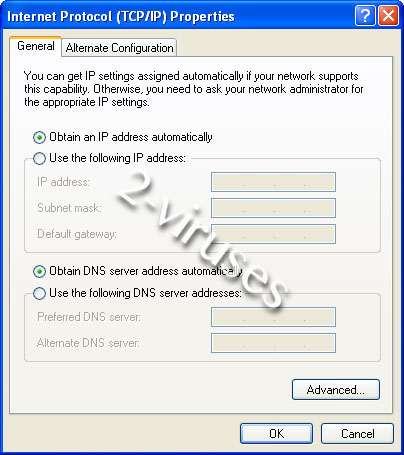
4. You will see a window like the one below – this is the Internet Protocol window. Select “Obtain an IP address automatically” and “Obtain DNS server address automatically”.
DNS Settings
5. Click OK to save changes.
Step 3. Checking your proxy settings on Internet Explorer
Proxy server settings can be used to implement Google search result hijacking as well. This is simple to fix too:
1. Launch your internet explorer.
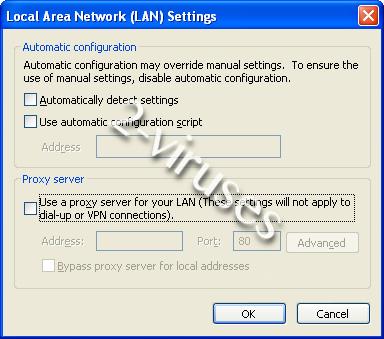
2. Tools ->Internet Options, Connections tab. Press LAN Settings
Internet Explorer local area network settings
3. Unselect everything or enter parameters that were given by system administrator.
4. Press OK.
Step 4. (Optional) Check your proxy settings on Mozilla Firefox
1. Launch Mozilla Firefox.
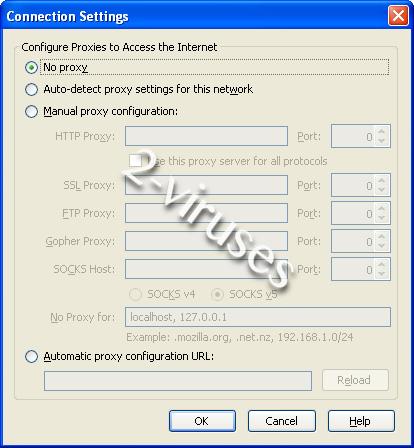
2. Tools ->Options. Press Advanced and open Network tab. Then, press Settings button.
Mozilla Firefox network settings
3. Select “No proxy” or enter parameters that were given by system administrator.
4. Press OK.
Step 5. Check your IE add-ons
If your browser is hijacked in IE only, check IE browser ad-ons. Note: there are malicious plugins that affect both IE and firefox and result in Google redirects in both of the pages.
1. Launch your internet explorer.
2. Tools->Manage Addons
3. Disable all unverified addons (there might be some useful ones, but better re-install them later).
Delete all ad-ons that look spammy/unknown.


that is all!!!


that is all!!!!
Retweet this story
How To Fix Slow Running Computer

This issue can be caused by any of the below possibilities.
  1. Not enough hard disk space.
  2. Left over programs and bad files.
  3. Data Corruption.
  4. Missing Windows updates / Outdated drivers.
  5. Computer is overheating.
  6. Corrupt OS.
  7. Bad Hardware.

Solution


        Reboot
If your computer has not been reboot recently make sure to reboot it before following any of the below steps.
Not enough hard disk space
Verify that there is at least 200-500MB of free hard disk drive space. This available space allows the computer to have room for the swap files to increase in size as well as room for temporary files.
Hard drive corrupted or fragmented
run scan disk or something equivalent to verify there is nothing physically wrong with the computer hard disk drive.
run defrag to help ensure that data is arranged in the best possible order.
Update your drivers
Make sure you've got the latest drivers for the computer. Especially the latest video drivers. Having out-of-date drivers can cause an assortment of issues.
Retweet this story